Back to All Guides
GET IN TOUCH
If you would like to get further information about Frog or help in getting it set up in your school please get in touch via the contact details below...
hello@frogeducation.com
System Preferences
System preferences is a collection of tools that allows you to set and manage various global settings for your Frog system.
The aim of this guide is to introduce you to:
- About System Preferences
- Acceptable Use Policy
- Assessment Cycles & Targets
- Assignment Manager
- Assignment Settings
- Custom Tags
- Dashboard
- File Types
- Frog Mobile App Preferences
- Frog Progress Settings
- Google Apps
- Login Background
- Network
- Notifications
- Office 365
- Profile Authentication
- School Details
- Timeline
- Maintenance
About System Preferences
System preferences is a collection of tools that allow you to set and manage various global settings for your Frog system. If you are a user with an Admin profile, you can run System preferences from your Profile menu in the top right hand corner of the screen. Depending on how it is set up, you may also see it in your Quick launch menu. It is possible for it to be removed from Quick launch as that is configurable.
When you open System preferences, you will see that in order to make it easy to navigate it is divided into different sections that group settings into the areas they affect.
To see the settings for a particular section, select on the section title in the left hand panel. For some sections, you will need to scroll down in the right hand panel to see all the available settings.
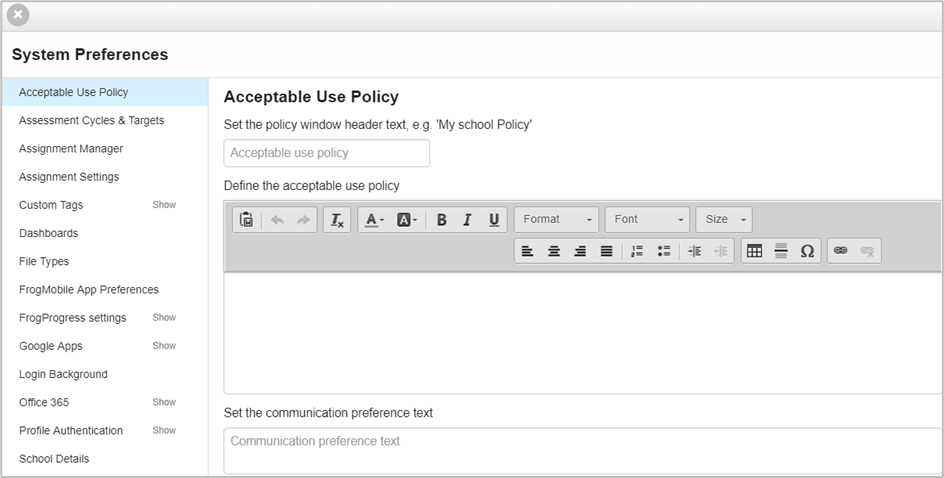
Acceptable Use Policy
Frog gives you the ability to display an Acceptable use policy (AUP) to users the first time they access Frog. If they do not accept the AUP, they cannot go any further.
You can type in the text in the space provided or copy it from an existing document.
Note: If you copy and paste it in, you may have to reformat the text, depending on the source you took it from.
Note: The Set the communication preference text can be ignored – it is not used as part of the Education Management System (EMS). Do not put any text into this box, as it will appear underneath the AUP you have designed, if you choose to use it.
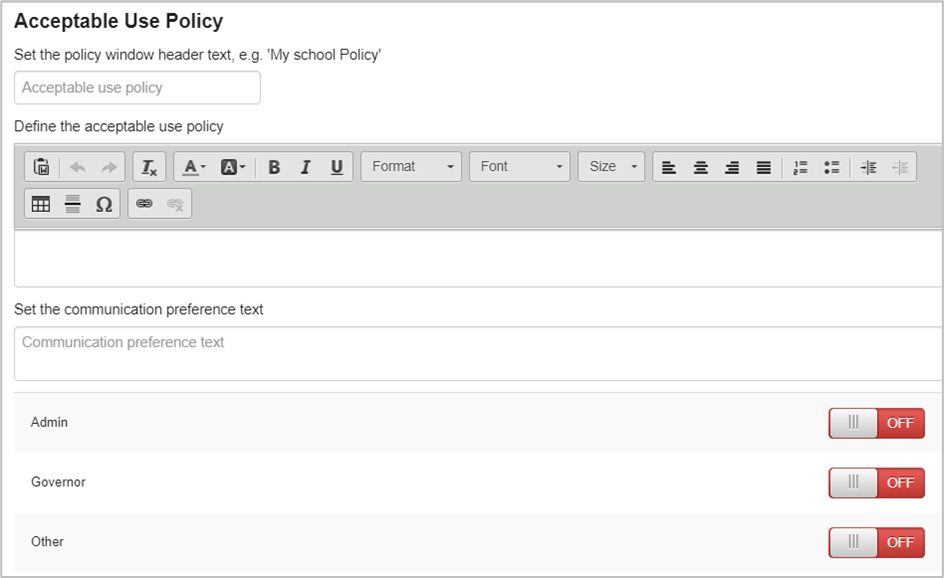
The toggle buttons for each profile allow you to set which profiles must accept the AUP before they can continue into Frog.
If you scroll all the way down to the bottom of the AUP settings, you will see these buttons. If you make any changes, you MUST scroll all the way down and select Save, otherwise your changes will not be applied.
The Force users to re-accept button, will reset the AUP accepted flag and the next time users who need to accept the AUP (set by the profile toggles mentioned above) to access Frog, they will need to agree to the AUP again. This is so that if your AUP is updated or changes for any reason, you can make sure users have agreed to the latest AUP.
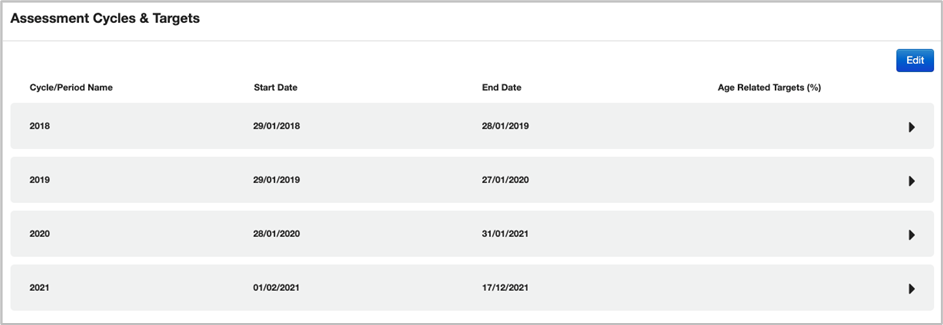
Assessment Cycles & Targets
Assessment cycles are used by Assignment manager and also Frog progress to define a Year (the Cycle) and Term (the Period) for an assignment in Frog learn or a judgement in Frog progress to be carried out.
These have been predefined for the next three years. If you would like to change these, select Edit and Save changes once completed.
Assignment Manager
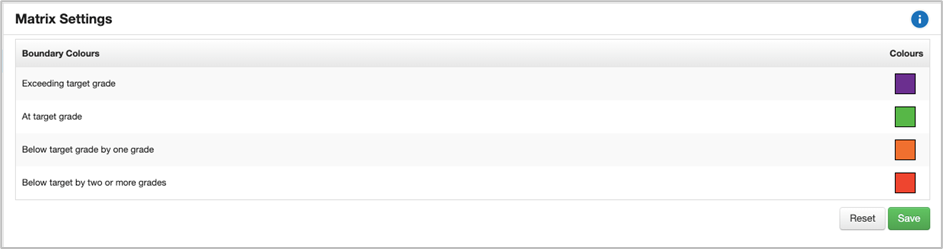
In Assignment manager, when you set a target grade in the Matrix, Frog will automatically colour code the student’s grade against the target grade. You can set the colours Frog uses in this section.
To change the colour, simply select on the colour you would like to change and choose a new colour from the colour picker. Select the Save button when you have made your changes, and Frog will start to use the new colours when a user goes to the Matrix view in Assignment manager.
Selecting Reset will return the colours to their factory defaults, as shown in the screenshot above.
Assignment Settings
Admin users have the ability to set the default option of the Mark scheme in the assignment wizard from within System preferences. This can be set to “No mark required” by toggling it on or off.
You can also set the default state of the assignment auto close preference. Toggling this to on will mean all assignments will automatically close after the due date.

Custom Tags
Custom tags has two subsections – Subject tags and Year/Stage tags.
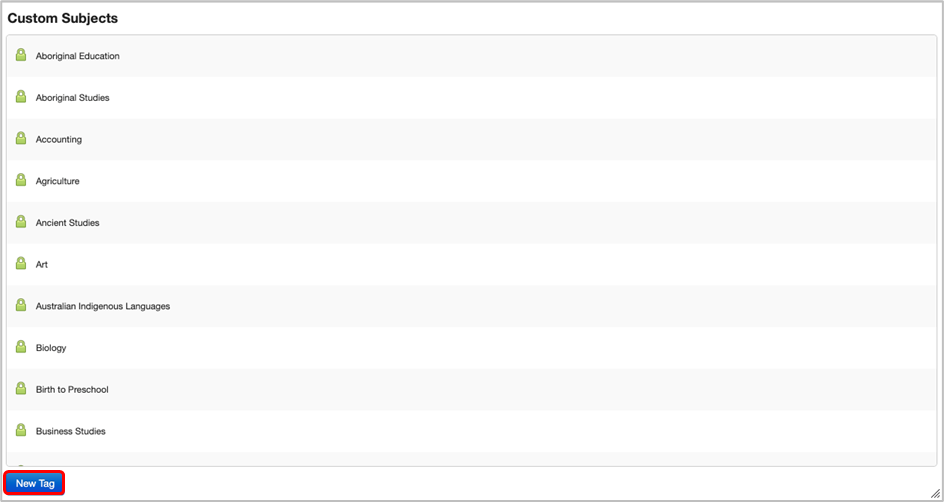
Subject tags
Frog maintains a list of subjects that can be used to tag sites and resources with so they can be easily searched and filtered using widgets such as the Frog site list widget.
Frog has a set of core tags, which cannot be changed. These are shown in the list as having a green padlock next to them.
You can add to this list by selecting on the New tag button, typing in the name of your new subject and then selecting on Save. Your custom subject tag will then appear below the list of core tags.
Custom created tags can be toggled on/off to show/hide them from users. You can edit their name at any time by selecting on the pencil icon to the left of the subject name. Any changes made will be reflected across any sites or resources that have already had this tag applied to them.
Year/Stage tags
Year/Stage tags work in exactly the same way to subjects. Year/Stage tags has one other setting that you can change – you can edit the title of the tag. Selecting the pencil icon to the right of the Year/Stage heading will let you change it. This change will be reflected across the Frog user Interface wherever a user is choosing a Year/Stage tag.
Dashboard
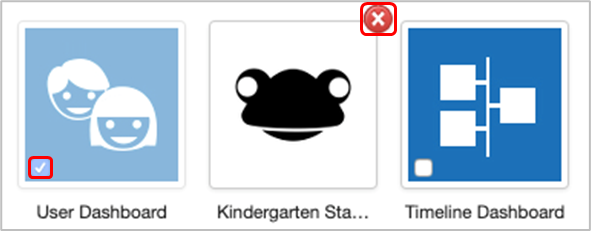
Dashboards are a collection of Frog sites that are loaded and displayed when a user logs onto Frog. The user can switch between these dashboards and other Frog sites and applications are loaded in over the top. A user cannot close a dashboard.
There are two system dashboards that cannot be removed but can be hidden (User dashboard and Timeline dashboard). The other 5 dashboards and the order all the dashboards appear in are completely configurable.
Each profile has its own set of dashboards that can be configured independently of other profiles. When managing dashboards you will need to begin by choosing the profile which you want to manage the dashboards for.
Then, add a Frog site to become a dashboard. To add a Frog site, find an empty slot (it will show a grey plus), and select on it. The standard FrogDrive site browser will appear. Find the site you want to use, select it and then choose the Use button.
You can also change the order of the dashboards by simply dragging and dropping them until they are in the order you require. As well, you can hide dashboard. If you want to hide either the User dashboard or User timeline, you can check the box in the dashboard icon. To remove a dashboard, select the red circle with a cross.
File Types
In order to maintain a level of security and prevent potentially harmful files to be uploaded to the platform, Frog maintains a whitelist of file types that users can upload to FrogDrive and/or sites. If the file type does not exist in this list, the user is prevented from uploading the file.
Frog maintains a core list of allowed file types which cannot be changed – although sites can choose to disable the ability to upload file type from this list.
We recognise that sites use many different types of software and may want to use Frog to curate resources used by software we are not aware of. To allow this, they can add file type to the whitelist to allow users to upload files from specific software packages.
Each profile has an individual and separate whitelist and custom file list, meaning you can make different provisions for each user type.
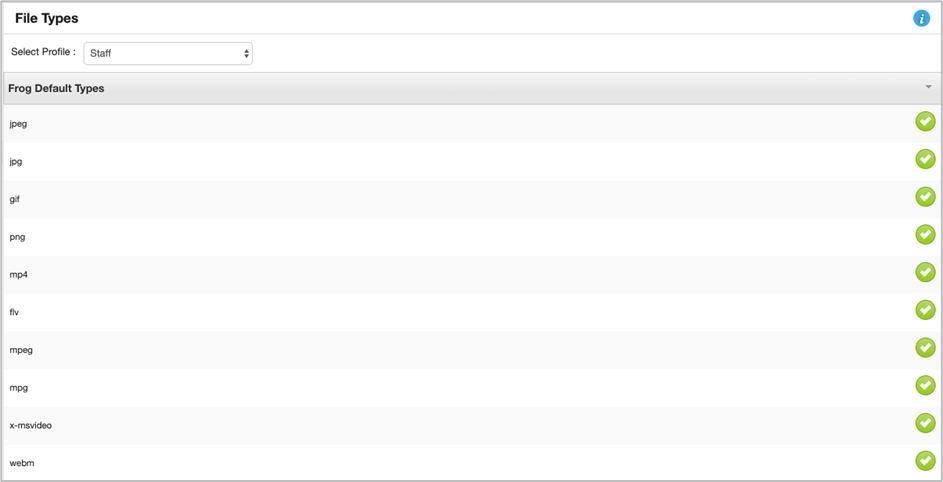
View a profile's whitelist
Each profile can have a different set of allowed core file types and custom file types. To choose the profile you want to manage, simply select on the dropdown box at the top of the section and choose the relevant profile from the menu.
Disable a core file type
Once you have chosen the profile you will see two subsections:
- Frog default types
- Custom types.
To view the list of default types, select anywhere in the grey bar to open it up. You can now turn individual file types on or off by selecting on the green tick to the right of the file extension.
Add a new file type to the watchlist
To add a new file type, choose your profile and select the grey bar sub-section labelled Custom types.
To add a type to the list you can either type in the file extension as a MIME type into the box then select the Add button. You will see the new file type appear in the custom list.
Note: You can only delete a custom type, not toggle it on/off as with the default list.
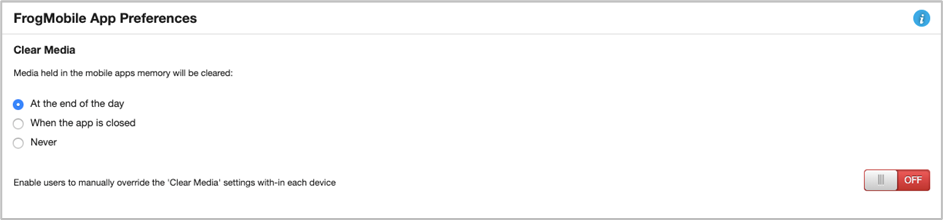
Frog Mobile App Preferences
Frog has a mobile application (FrogSnap) that allows users to capture images/video/audio. The global setting in this section allow the school to define how long media taken using these applications remain on the mobile device, to align with their particular safeguarding policy.
There is also a toggle to allow individual users to override this setting on their device, should the school approve.
Frog Progress Settings
Progress groups
The Frog progress groups settings allow you to manage which profiles and Group leaders have access to Progression charts and Reporting. Simply toggle on/off and Save changes.
Progression charts
This allows you to configure whether to show prior year alerts in progression charts, and if prior year alerts are shown for objectives that have no judgements against them and configure, configure when to release assessments, and allow the display of comments to be added to a User timeline of events.
Google Apps
To enable Google apps for your Frog environment requires integration between Frog and the DfE Google tenancy. This can be requested via edIT.
Login Background
When logging in directly to Frog, you can set the background to the login screen that the users will see here. As the EMS solution provides Single Sign On (SSO) to Frog, this screen is redundant, but there may be use cases in the future where some users may log in to Frog directly, or the login screen is briefly seen during the SSO process. Generally, this section will not be used.
If you do still wish to change this background, it is best to use an image with a JPEG, JPG or PNG extension type, or drag and drop a previous one. The optimum image size is 1680 x 895, with a file size around 200Kb. Excessively large images may slow down the login page, whilst small images may cause poor image quality.
Network
This feature is not currently enabled as part of the EMS solution. To learn more, please reach out to the EMS project - education.emsproject@sa.gov.au.
Notifications
Frog email notifications are currently set as default: noreply@frogmailer.com.
Ribbits are not currently enabled as part of the EMS solution. To learn more, please reach out to the EMS project - education.emsproject@sa.gov.au.
Office 365
To enable Office 365 for your Frog environment requires integration between Frog and the DfE Microsoft tenancy. This can be requested via edIT.
Profile Authentication
Frog uses Single Sign On (SSO) as part of the EMS solution. To learn more, please reach out to the EMS project - education.emsproject@sa.gov.au.
School Details
School details allow you to set your School name. It is not part of the EMS solution. To learn more, please reach out to the EMS project - education.emsproject@sa.gov.au.
Timeline
Frog uses timelines in various places, and has a default setting to refresh the timelines every 5 minutes. This section allow you to increase or decrease this interval (or turn it off entirely).

Maintenance
The maintenance section gives admin profiles the ability to see details about the synchronisation between the EMS and Frog.
This window will display:
- When the next import of EMS data is scheduled
- The last date and time EMS data was imported into Frog
- The date and time of the file received by Frog - this is to help differentiate the date and time of last import into Frog from the age of the data being sent from the EMS.
- Frog extractor version
- The EMS software version.
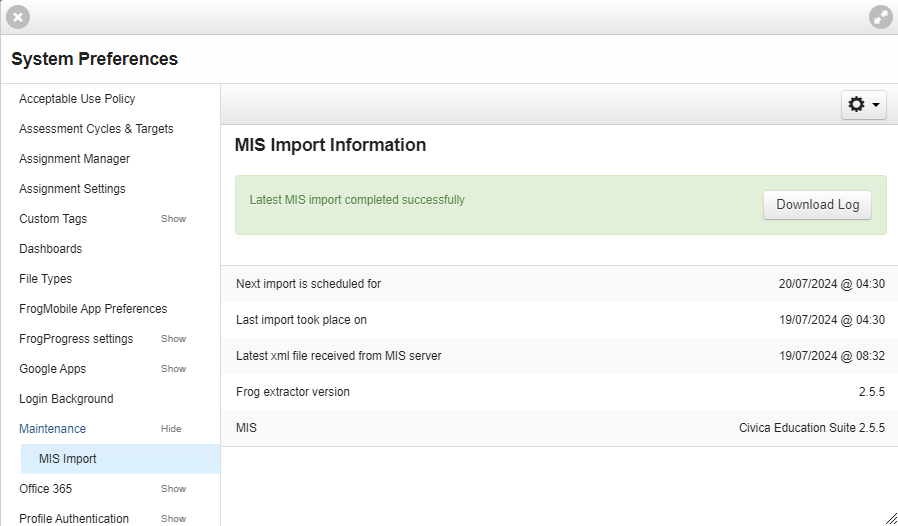
There are several options available in this window.
Download log
Clicking this button will download a .csv file that will contains a record of the last import. This can be provided to edIT for advanced troubleshooting if there are issues with the Frog/EMS synchronisation.
Run import
Clicking on the action cog in the top right hand corner will give you another option to 'Run MIS import'.
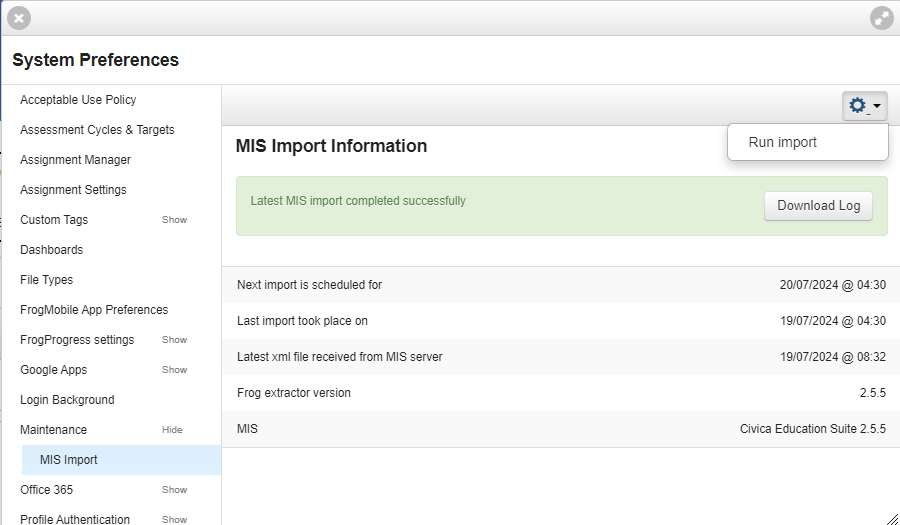
At the time of writing, clicking this option will not do anything. But in the future when Frog and the EMS sync more frequently, this option will ensure that Frog has the most up to date data from the EMS. This will be particularly useful when there are lots of changes to timetables, classes, students and staff during the start of a new academic year or semester and you need these changes to be reflected in Frog as soon as possible.