Back to All Guides
GET IN TOUCH
If you would like to get further information about Frog or help in getting it set up in your school please get in touch via the contact details below...
hello@frogeducation.com
Messages
The Messages application will facilitate users to send messages to either an individual user or group of users.
The aim of this guide is to introduce you to:
- About Messages
- Staff Messages Application Overview
- Staff - Create Announcement
- Student/Parent - View New Announcement
- Student/Parent - Reply to an Announcement
- Staff - View Announcement Replies
- Staff - Archive Announcement (Sent by me)
- Admin - View All Announcements (Summary)
- Admin - Frog App and Embedding of Messages Application
- Chat
About Messages
The messages app in Frog allows for communication within Frog between all users. It can be used primarily as a way to send short announcements and reminders to individuals or groups. Some of the key changes to the Message application include:
- Messages sent to users are referred to as “Announcements”.
- Staff / Admin users can send an announcement to a group / individual user(s) and allow for two-way communication. The communication back from recipients will only be available to the original sender of the announcement.
- The Messages application can be embedded on a dashboard / site via the “Frog App” widget and be made available for student, parents, and staff to quickly view their announcements.
- Students and parents can attach files/ links with their replies to an announcement.
- New announcements will display to users via a notification indicator displayed on the Inbox (Frog Bar) or the “Inbox” (students / parents) within the Messages application if embedded on a dashboard.
- Staff / Admin users will be able to monitor who has read or archived announcements they have sent. Admin users will be able to monitor and view all sent announcements, and where applicable have access to delete an announcement.
As of 2025, the messages app has been further enhanced. The Frog Learning Management System has introduced a robust Chat feature within its Messages application, enhancing communication for South Australian teachers, students, parents, and staff. This guide provides a detailed overview of the features, usage, and various ways to access this new tool.

Staff Messages Application Overview
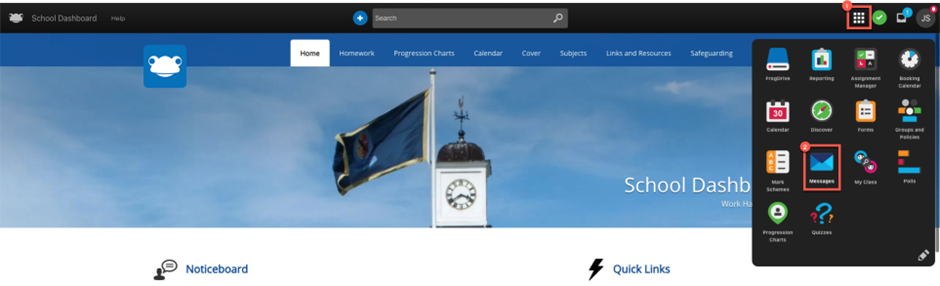
Staff and admin users will have the ability to create an announcement for an individual(s)or group(s). To create an announcement, navigate to the Frog bar > Quick Launch > Messages.
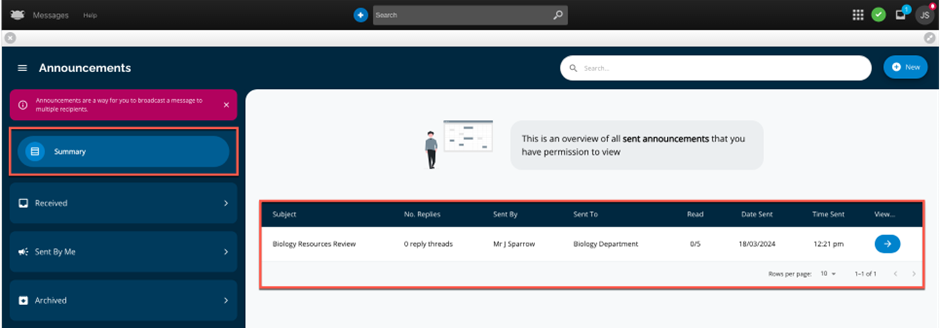
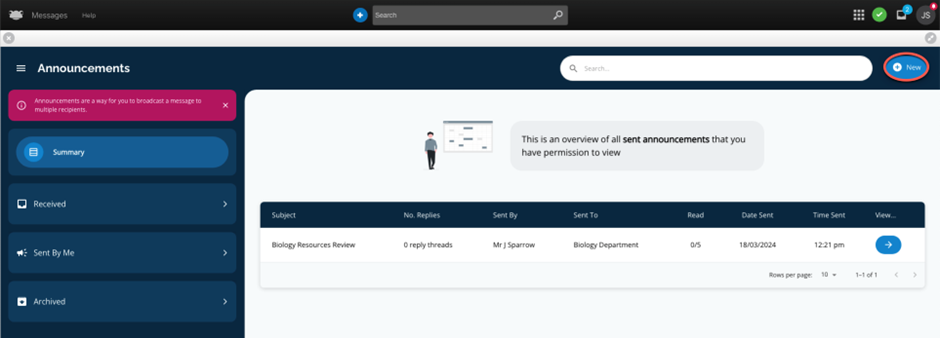
When the Messages application opens the most notable change is the new modern look and feel. Staff users will be automatically directed to the Summary section, presenting a comprehensive overview of all your sent announcements.
The Received section displays all announcements that have been sent directly to you or as part of a group. Think of this area akin to your inbox. To view your received announcements, click on the > icon to expand this section.
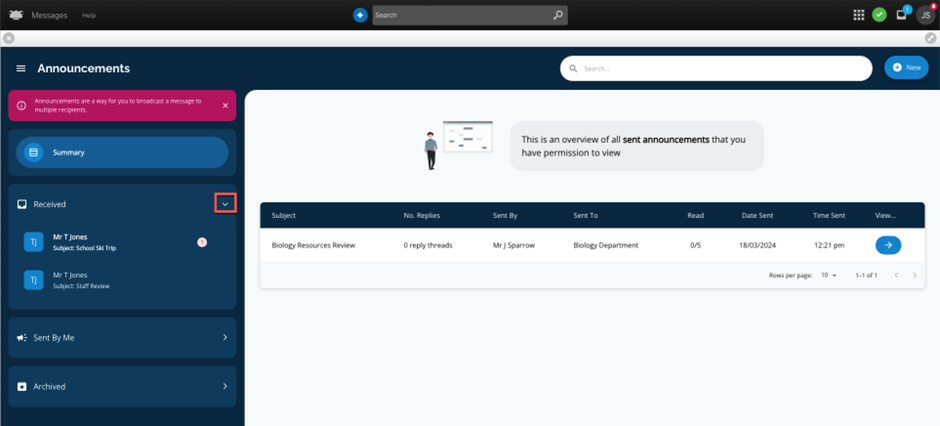
New announcements will be indicated by a small red badge with the number 1 on the right of the announcement.

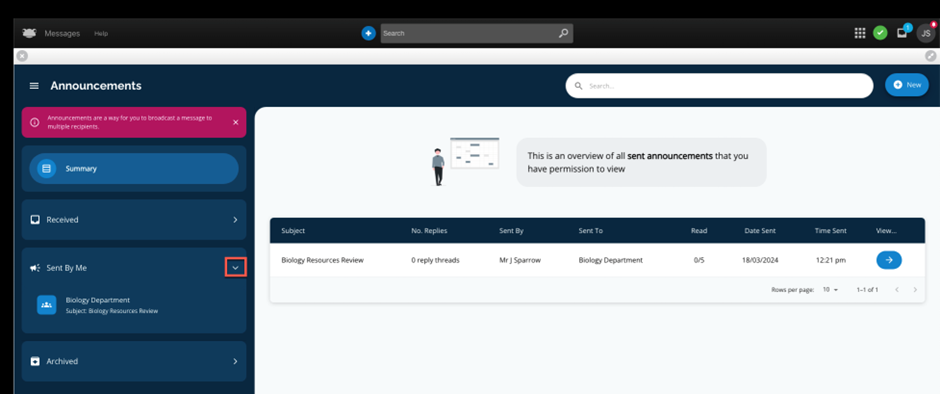
The Sent by Me section displays all announcements that you have sent. To view your sent announcements, click on the > icon to expand this section.
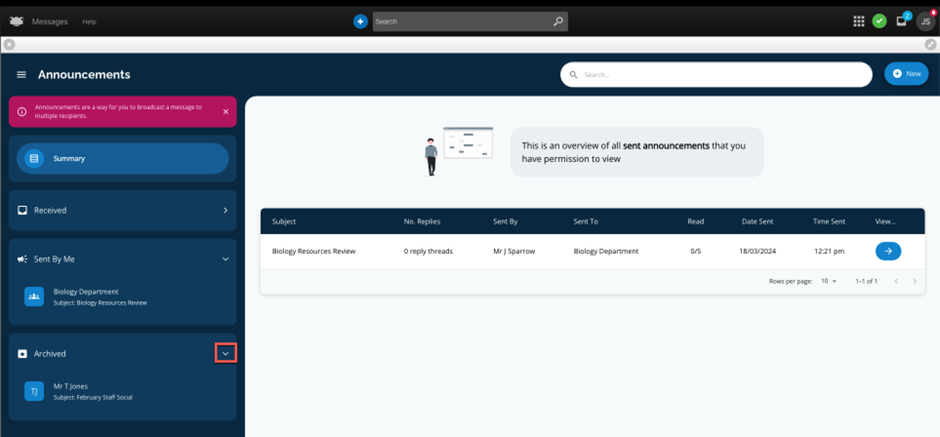
The Archived section displays all announcements that you have chosen to archive, whether they were received or sent by you. To view your archived announcements, click on the > icon to expand this section.
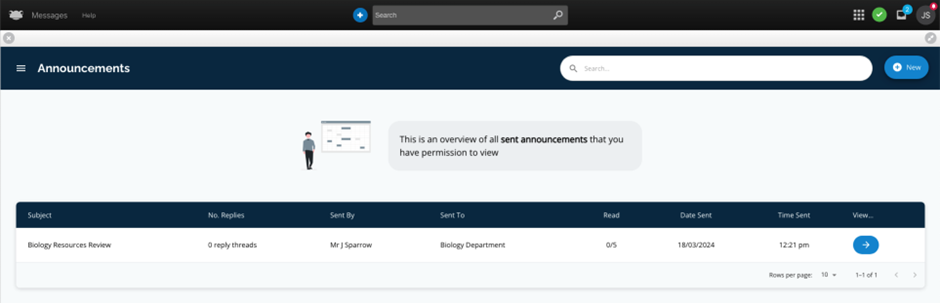
Selecting the burger menu next to Announcements (top left) will hide the Announcements sidebar, allowing the Summary area to be maximised.
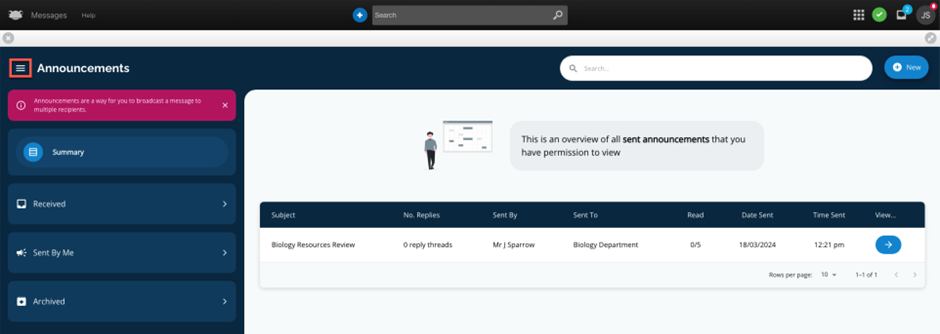
View below is after selecting the burger menu.
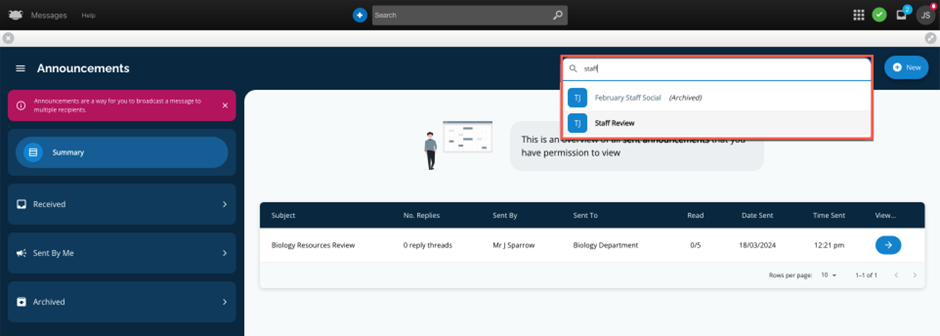
Above the Summary section, you'll find a search field. Enter a search term, and it will be used to search through all your sent and received announcements, displaying any matches found. Search will find any announcement subject or announcement content.
In this example, after entering the search term staff two announcements matching the criteria are displayed. To view the content of a specific search result, simply select the announcement you wish to view.
Lastly, next to the search field is the + New button that allows staff to create an announcement. In the next section we will show you how new announcements are created.
Staff - Create Announcement
Both staff and admin users will have the ability to create announcements for individuals or groups. To create an announcement, select the + New button.

The New Announcement pop up window will be displayed
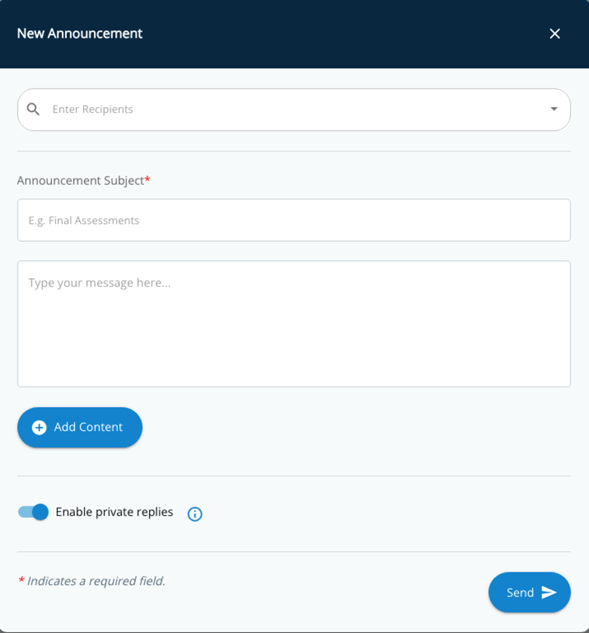
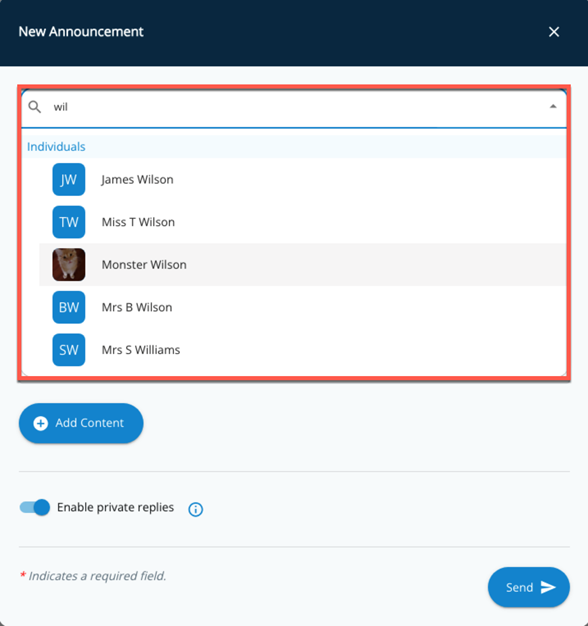
The first step is to specify the recipients you intend the announcement to be sent to. This can be either an individual or a group. If you wanted to send an announcement to an individual, enter in a few letters of their first or last name, and the system will display any users matching your search criteria. In this example we searched for "wil" to have a list of users matching the criteria displayed for selection.
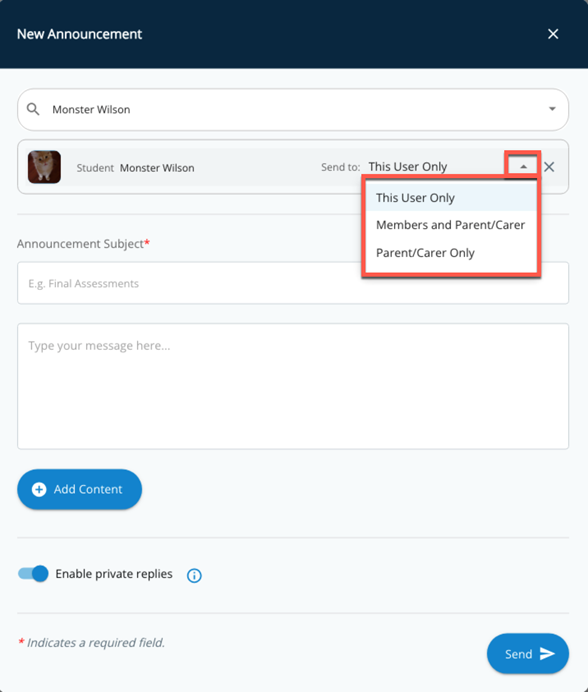
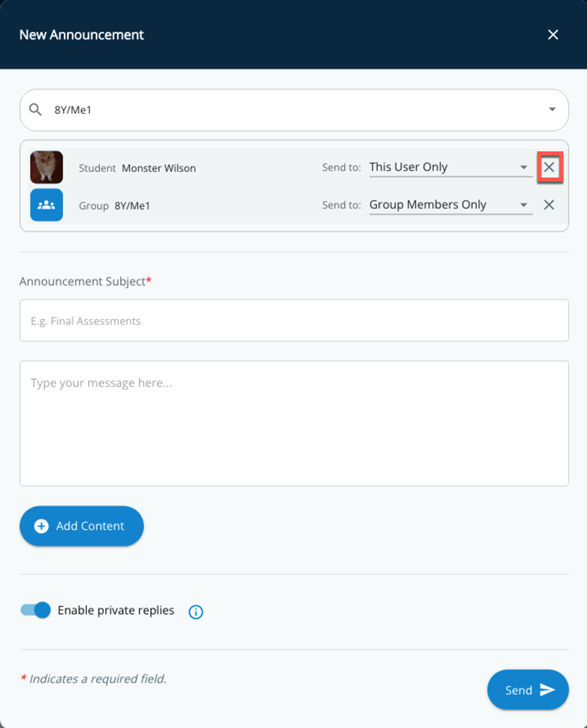
The student Monster Wilson has been selected and is added as a recipient to the announcement. By default, the Send to option will be set to This User Only. However, there are various options available. These options differ depending on whether an individual user or group has been selected.
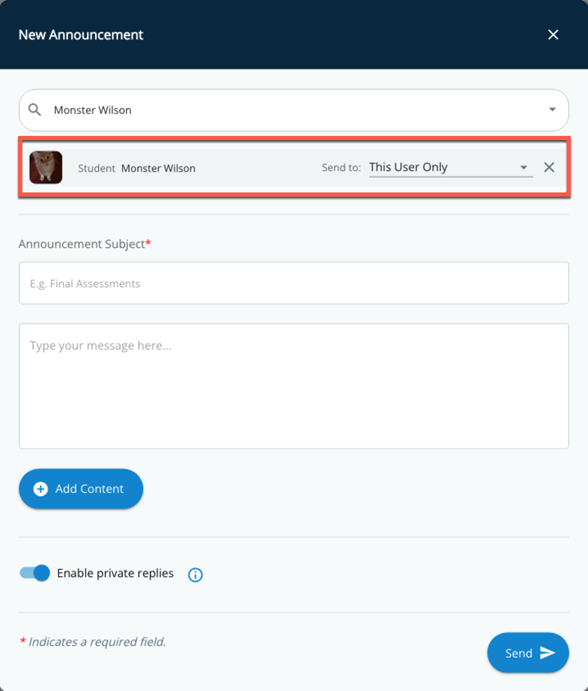
If we select the arrow next to This User Only, for an individual the following options are available:
- This User Only – Announcement will only be sent to the selected individual.
- Members and Parent /Carer – Announcement will be sent to the selected individual as well as their associated parent/carer.
- Parent/Carer Only - Announcement will only be sent to the selected individual associated parent/carer.
As mentioned earlier, an announcement can be sent to individuals or groups. We are briefly going to look at how you can add a group to an announcement and the send options available.
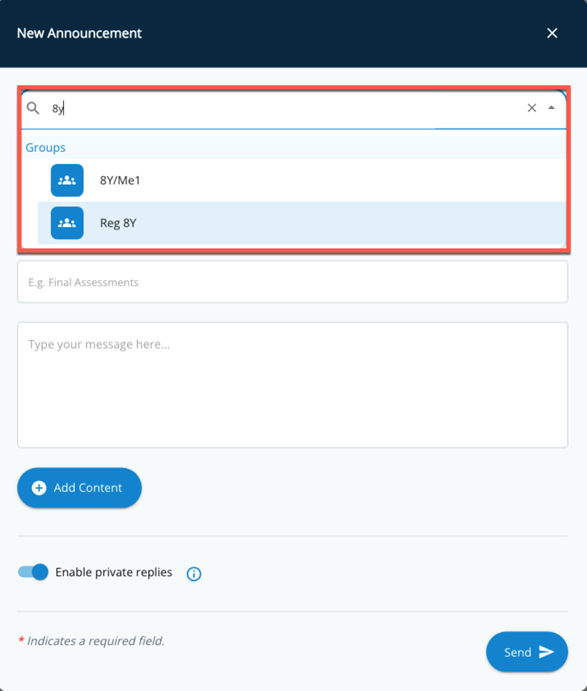
In the recipient’s field, enter in a few letters of your class, and the system will display any groups matching your search criteria. In this example we searched for 8y to have a list of groups matching the criteria displayed for selection.
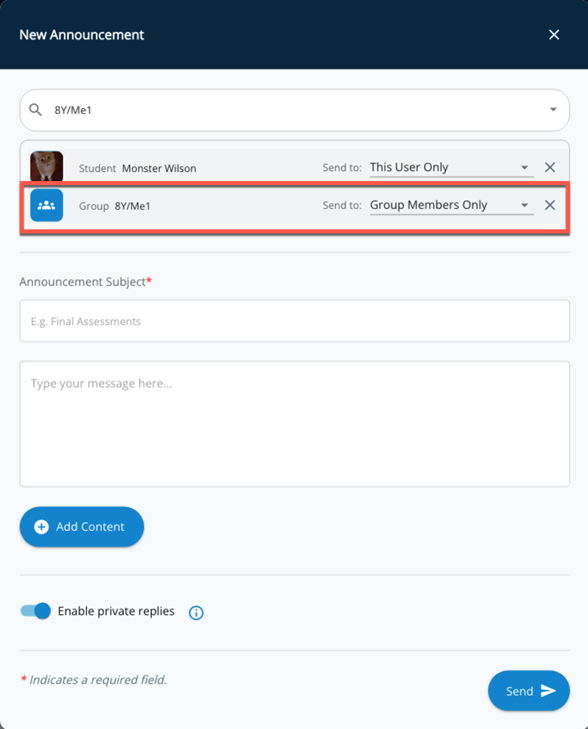
The group 8Y/Me1 has been selected and is added as a recipient to the announcement. By default, the Send to option will be set to Group Members Only. However, there are various options available. These options differ depending on whether an individual user or group has been selected.
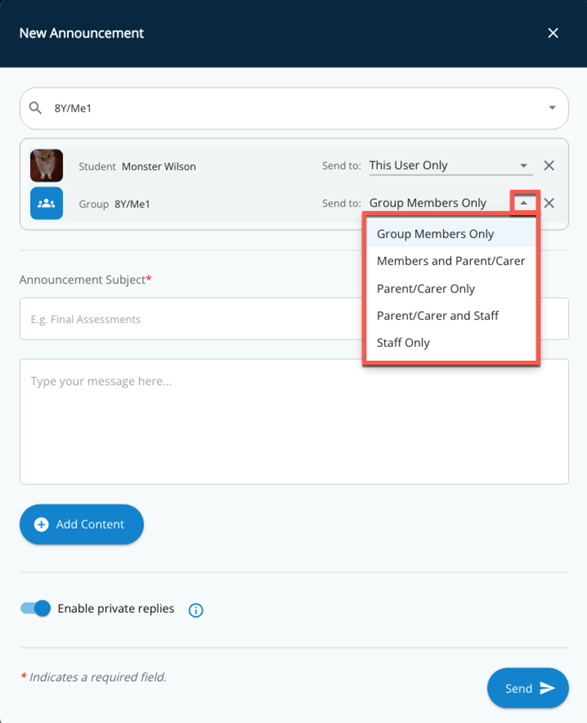
If we select the arrow next to Group Members Only, for an individual the following options are available:
- Group Members Only - Announcement will only be sent to individuals associated with the selected group.
- Members and Parent /Carer – Announcement will be sent to individuals associated with the group as well as their associated parents/carers.
- Parent/Carer Only - Announcement will only be sent to the associated parents/carers of the individuals associated with the selected group.
- Parent/Carer and Staff - Announcement will only be sent to:
- Staff associated with the selected group and
- Parents/carers of the individuals associated with the selected group.
- Staff Only - Announcement will only be sent to staff associated with the selected group.
For this example, we are going to opt to send the announcement to the group 8Y/Me1. To remove a recipient from an announcement simply select the x icon next to the individual or group you wish to remove.
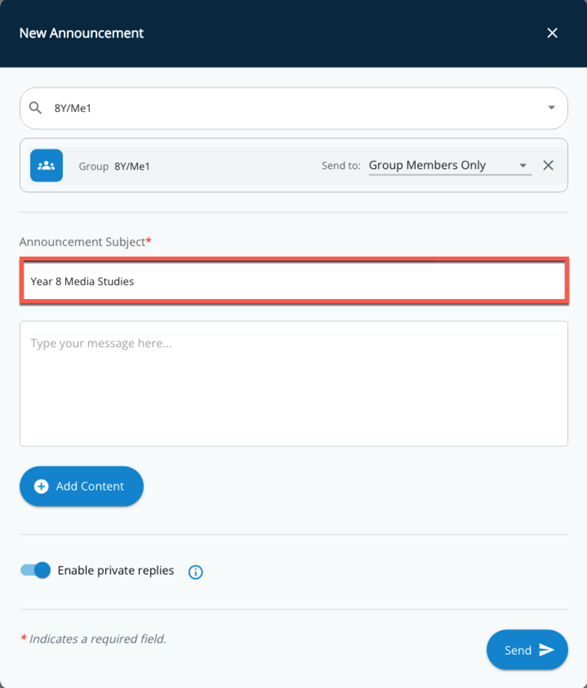
Next is the Announcement Subject field. Enter a concise summary to give recipients an understanding of the announcement's content.
In this example, Year 8 Media Studies has been entered as the Announcement Subject.
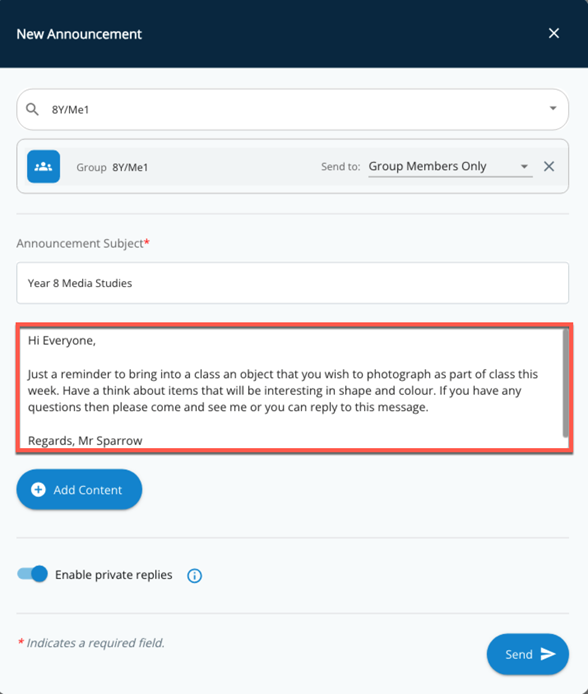
Next, proceed by adding the details of your announcement.
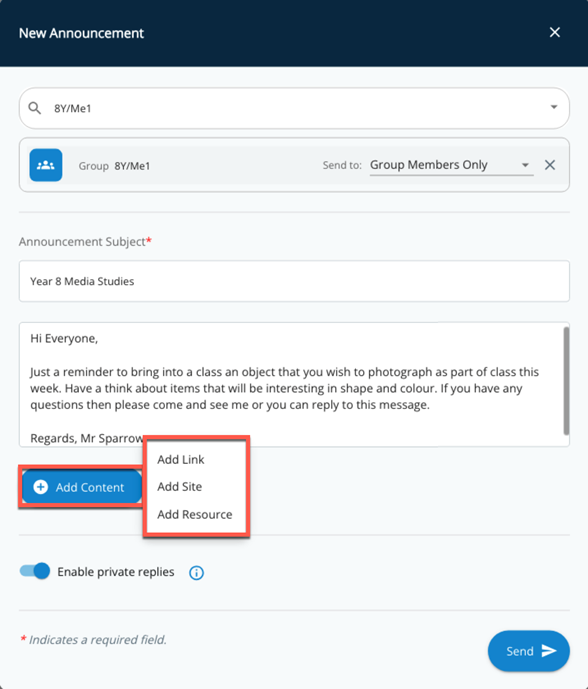
You may wish to include a resource with your announcement. Select the + Add Content button and you will have three options available:
- Add Link
- Add Site
- Add Resource
Note – Only a single item (site, link, or file) can be added to an announcement.
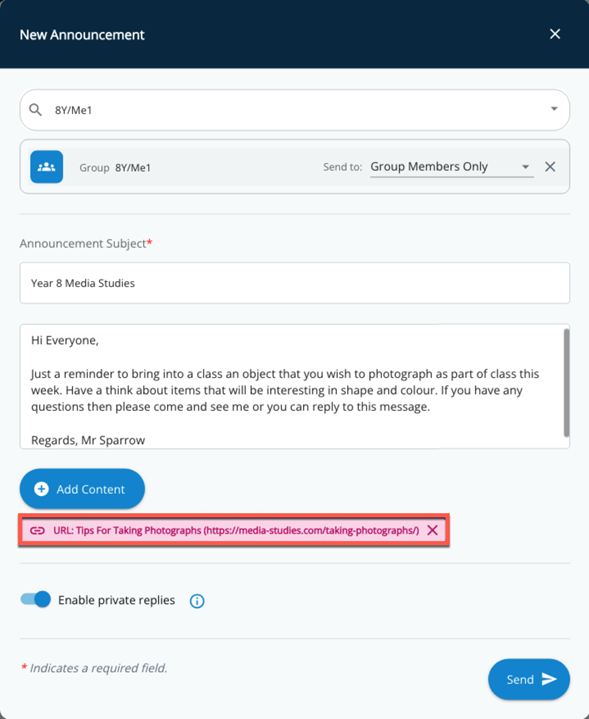
With the Add Link option, you can input a name and a corresponding link to a website.

When a link is added, it will display the name and website URL entered just below the + Add Content button.
In the example below the details that entered were:
- Link Name – Tips For Taking Photographs
- Link URL - https://media-studies.com/taking-photographs/
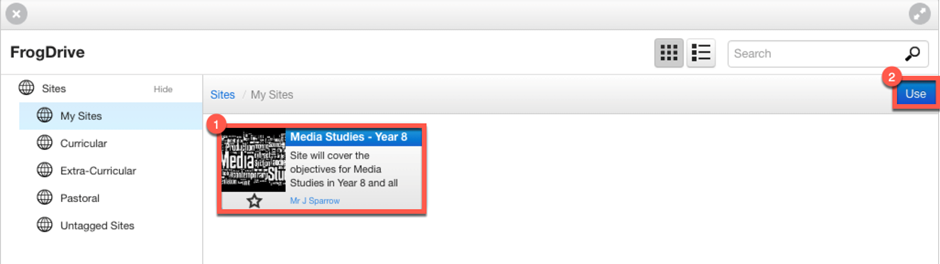
With the Add Site option, this will launch a pop-up window that displays FrogDrive > Sites. Choose your site, and then select the Use button to have the site linked to the announcement.
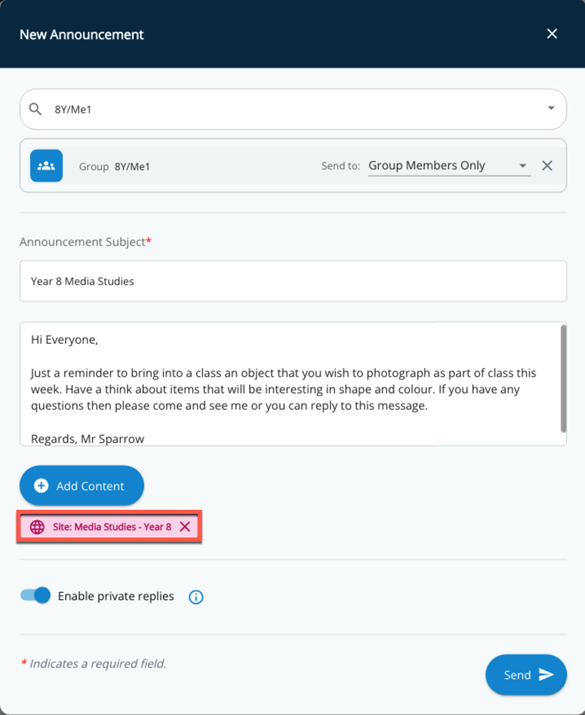
In this example we have selected the site Media Studies – Year 8 to be linked to the announcement.
When a site is added, it will display the site name just below the + Add Content button.
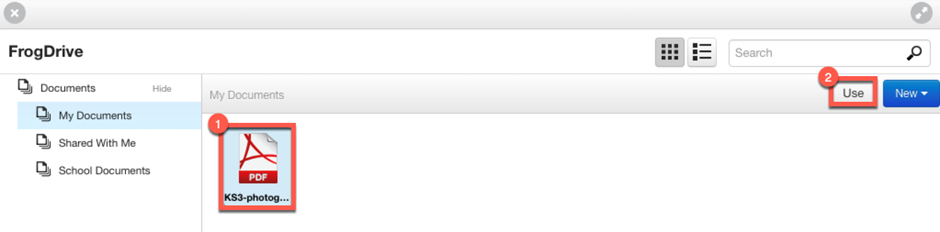
With the Add Resource option, this will launch a pop-up window that displays FrogDrive > Documents. Choose a resource from your FrogDrive area or if a file exists on your local device, then go to New > File to upload your required resource.
Once you have chosen your resource, select the Use button to have the file linked to the announcement.
In this example we have selected a PDF file to be linked to the announcement.
When a resource is added, it will display the name of the resource just below the + Add Content button.
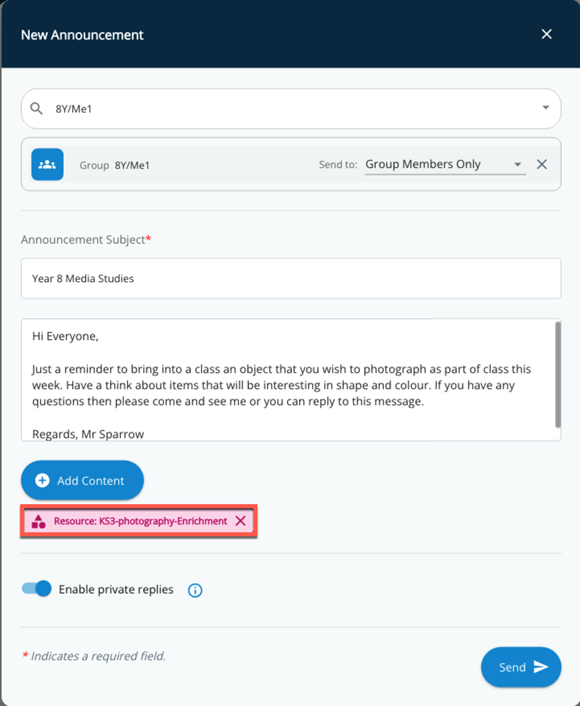
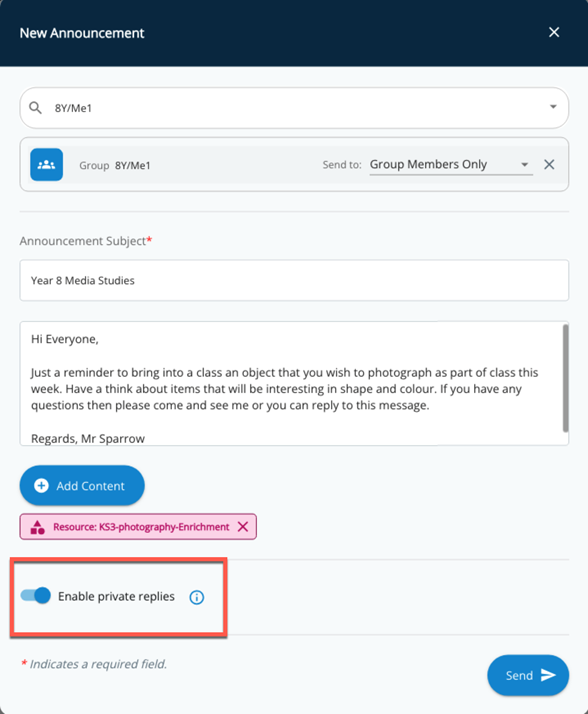
The final setting available when creating an announcement is the new feature to Enable private replies. When enabled, this setting allows recipients of an announcement to reply via private reply threads.
NOTE – Recipient replies are private and can only be seen by the sender of an announcement.
In this example, we are going to leave the toggle enabled for Enable private replies.
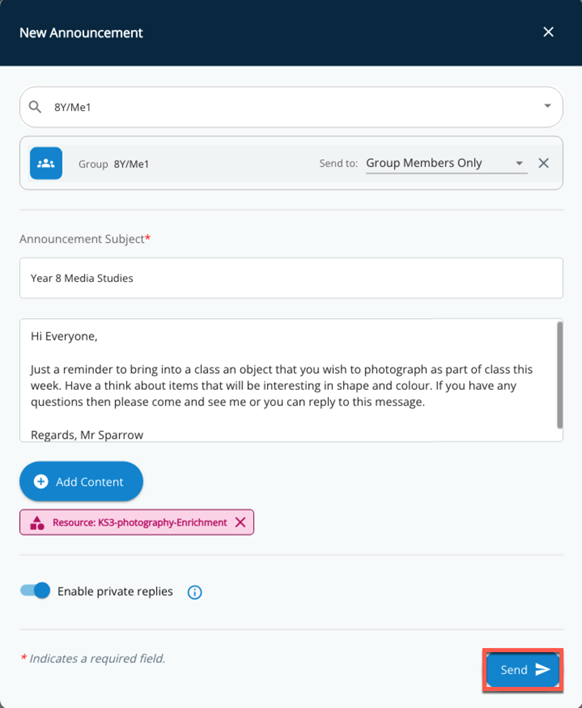
When happy with the content of your announcement click the Send button. The announcement will then be sent to all recipients.
Student/Parent - View New Announcement
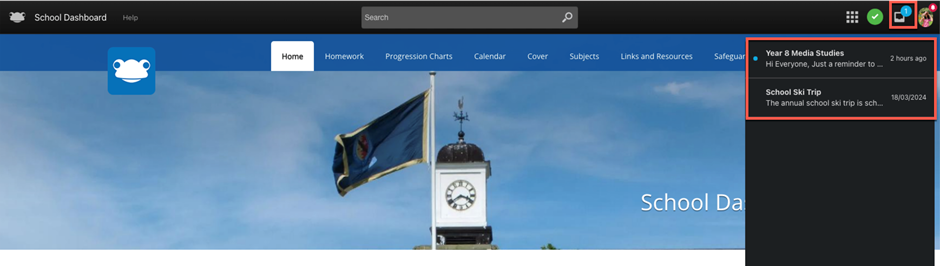
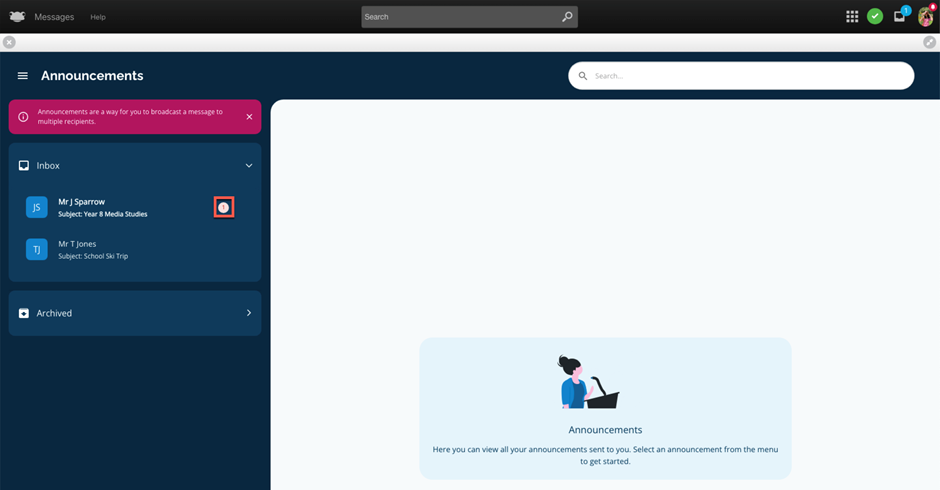
We will now look at how a student / parent would view an announcement. When a new announcement is received, a blue badge will display on the Inbox icon within the Frog Bar. When the Inbox is selected a list of received announcements are displayed. Those with a blue dot next to them indicate that they are new or unread announcements.
In the example below, we are logged in as a student and can see that the blue badge shows as 1 on the Inbox icon. Upon selecting the Inbox, it will display a summary of the announcements including the subject, start of the announcement details and when the announcement was received.
Students and parents will also have access to the Messages application, which can be found within Quick Launch, allowing them to view their announcements.

When opening the Messages application via Quick Launch, the students and parents will experience the new modern look and feel.
The Inbox will display all your received announcements, click on the > icon to expand this section.

New announcements will be indicated by a small red badge with the number 1 on the right of the announcement.
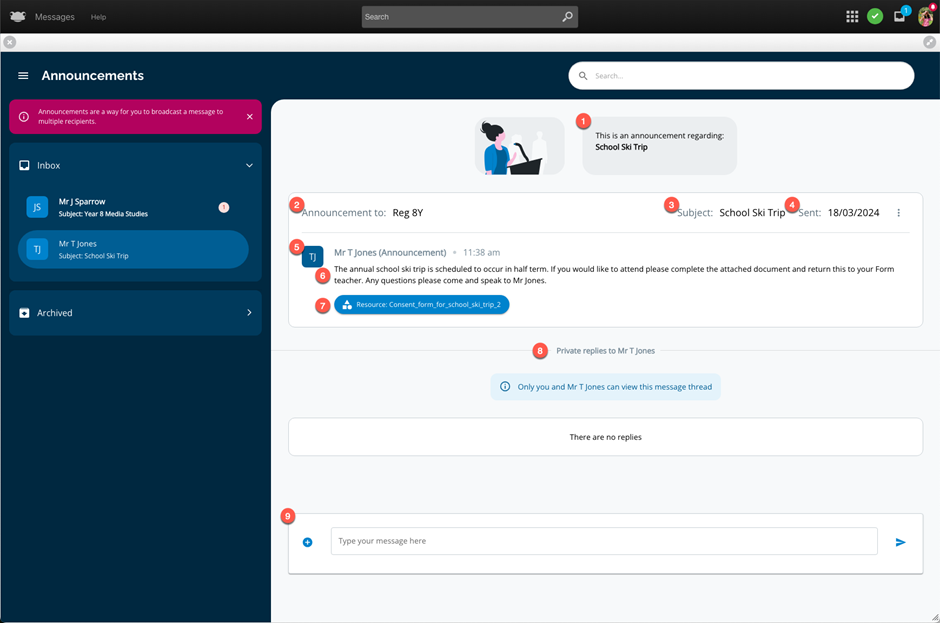
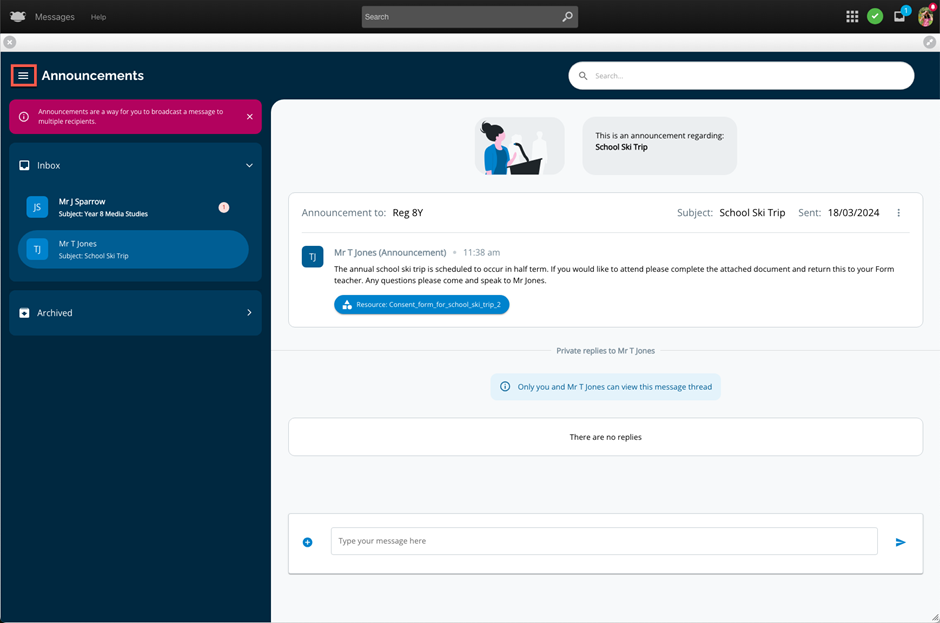
When selecting an announcement from the Inbox, details of the announcement will be displayed on the right-hand side.

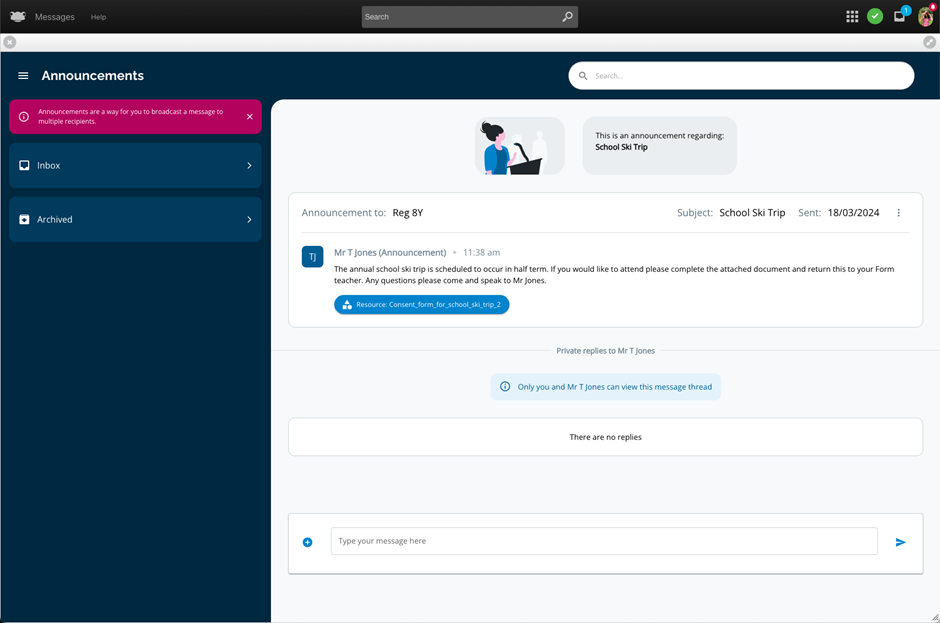
The announcement information displayed to the student/parent include:
- Information box informing the student / parent the announcement message they are viewing. e.g. School Ski Trip
- Announcement to field showing who the announcement was sent to. e.g. The group Reg 8Y
- Subject field displaying a description of what the announcement is about. e.g. School Ski Trip
- Sent field displaying the date when the announcement was sent. e.g. 18/03/2024
- Details of the staff user that sent the announcement. In this example, the initials TJ show with the name of the teacher, Mr T Jones. Should the teacher have a profile picture associated with their Frog account this would display instead of initials.
- Details of the announcement
- Should an announcement contain any associated links, sites, or resources this will display below the announcement detail. In this example, a file called Consent_form_for_school_ski_trip_2 has been attached to the announcement. Select the link to view the content.
- This section would show any replies between the staff user that sent the announcement and yourself. In this example, there is no replies yet. More information on replies will be covered in a future section.
- This field allows you to send a private reply to the staff user that sent the announcement. More information on replies will be covered in a future section.
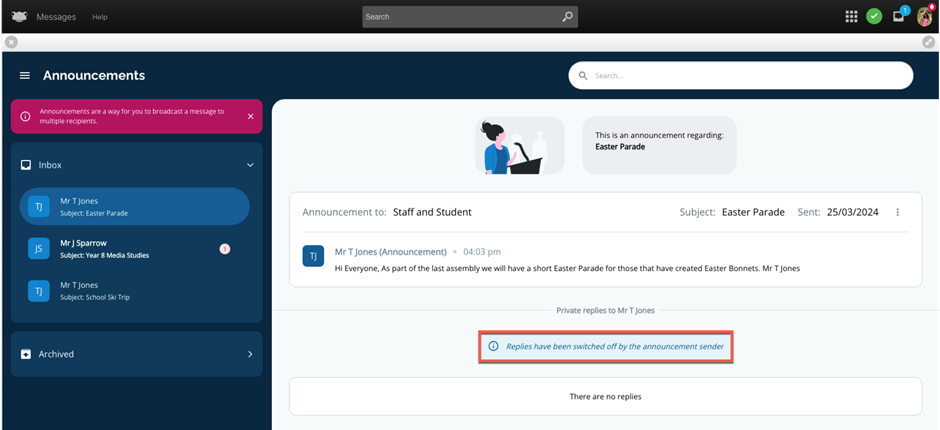
Not all announcements will allow replies, as this preference will be set by the staff user sending the announcement. If replies are not enabled, the message below will be displayed:
Replies have been switched off by the announcement sender
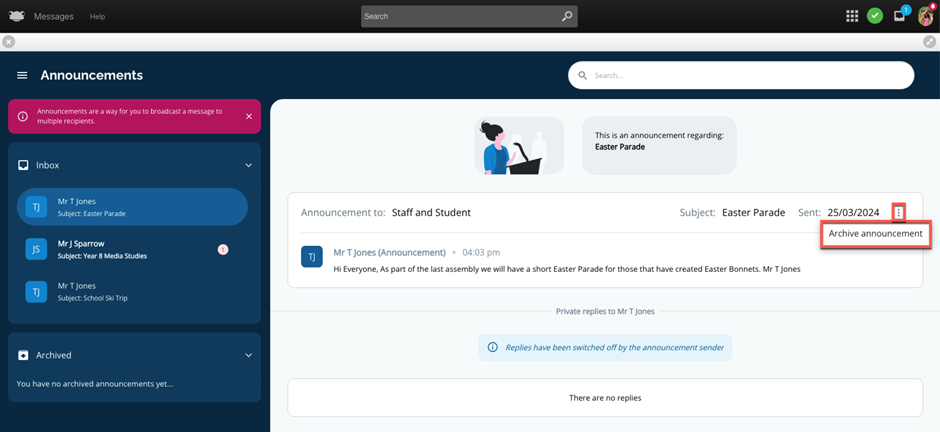
If you wish to archive an announcement, navigate to the ellipsis (three vertical dots) within the selected announcement and choose the option Archive announcement.
The announcement will be moved from your Inbox to Archived.
To view your archived announcements, navigate to the Archived section and click on the > icon to expand this section.
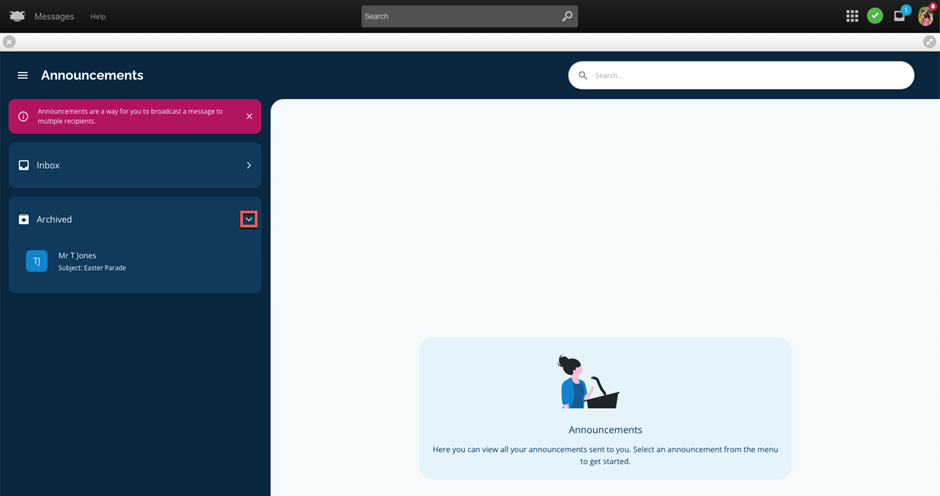
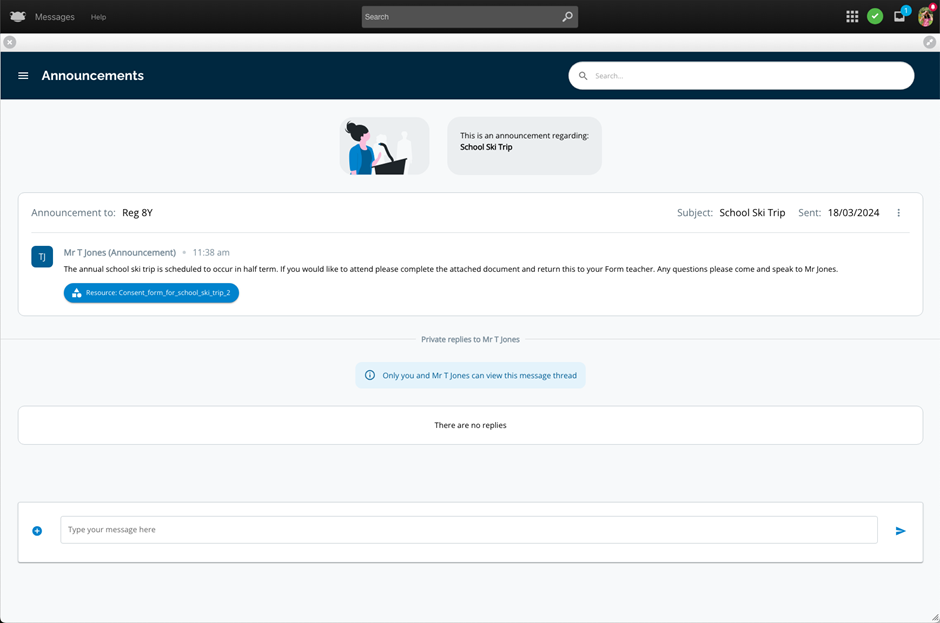
Selecting the burger menu next to Announcements (top left) will hide the Announcements sidebar, allowing a selected announcement to be maximised.
View below is after selecting the burger menu.
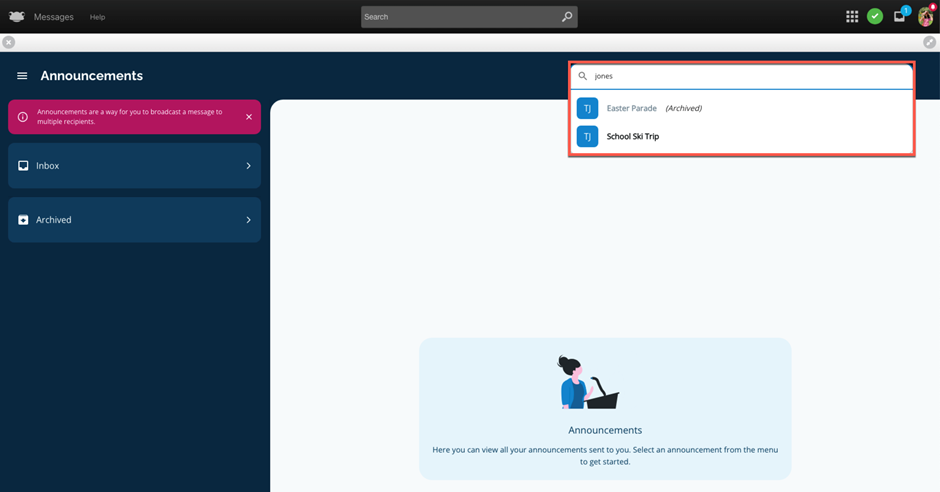
In the top right there is a search field available. Enter a search term, and it will be used to search through all your received and archived announcements, displaying any matches found.
In this example, after entering the search term staff two announcements matching the criteria are displayed. To view the content of a specific search result, simply select the announcement you wish to view.
Earlier in this section we showed you how new announcements can be viewed via the Inbox in the Frog Bar.

If you select an announcement from the Inbox, the Messages application will launch automatically, taking you directly into the selected announcement, where you will see the details of the announcement.
In this example, the announcement with subject School Ski Trip was selected.
Student/Parent - Reply to an Announcement
We will now look at how a student / parent can reply to an announcement.
Please keep in mind that students and parents can only reply to an announcement when this preference is enabled by the staff user sending the announcement.
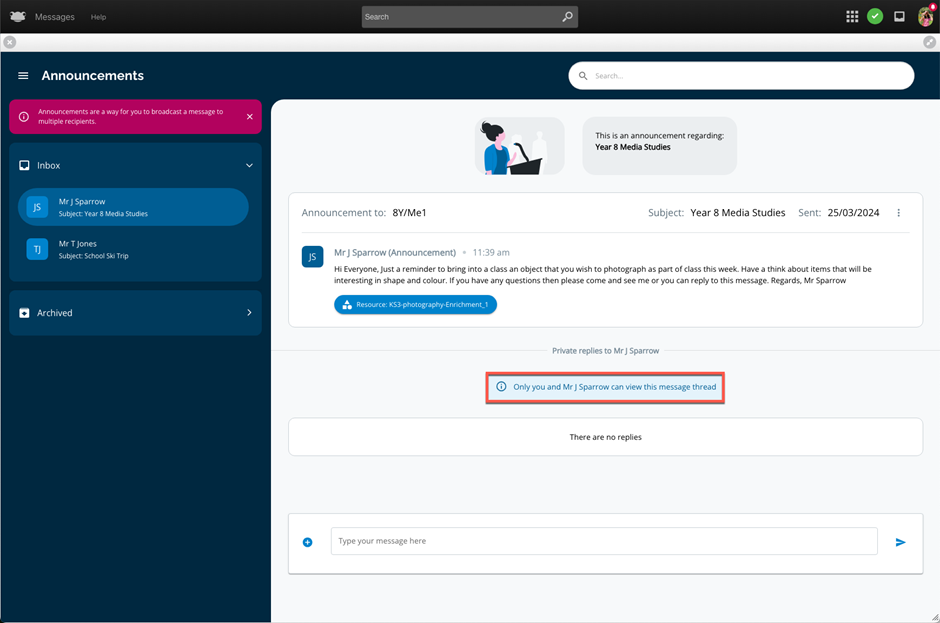
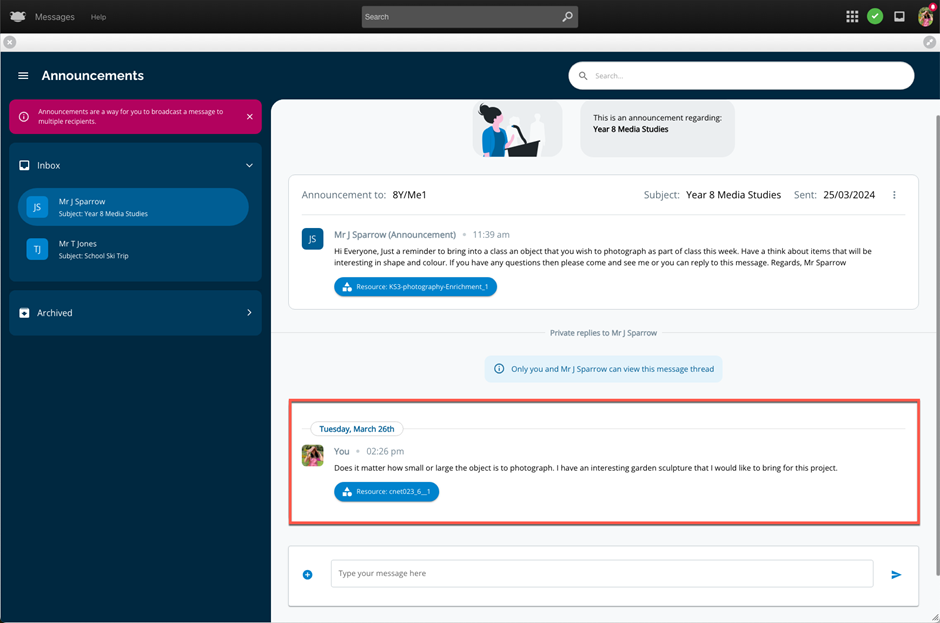
In this example, the student Tracy Rauch has selected an announcement with subject Year 8 Media Studies from Mr J Sparrow, and replies have been enabled indicated by the information message below:
Only you and Mr J Sparrow can view this message thread
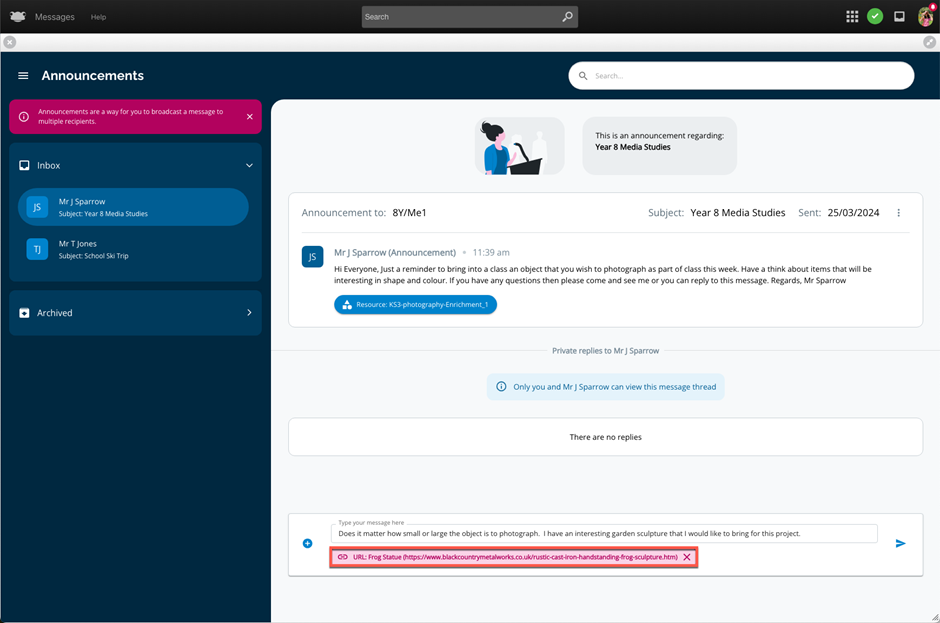
To reply to an announcement, enter your response into the field at the bottom.
As part of the reply, students and parents can also attach a resource.

Click on the + button to have the following options available:
- Add Link
- Add Resource
Note – Only a single item (site, link, or file) can be added to an announcement.
With the Add Link option, you can input a name and a corresponding link to a website.
When a link is added, it will display the name and website URL entered just below the reply.
With the Add Resource option, this will launch a pop-up window that displays FrogDrive > Documents. Choose a resource from your FrogDrive area or if a file exists on your local device, then go to New > File to upload your required resource.
Once you have chosen your resource, select the Use button to have the file linked to the announcement.
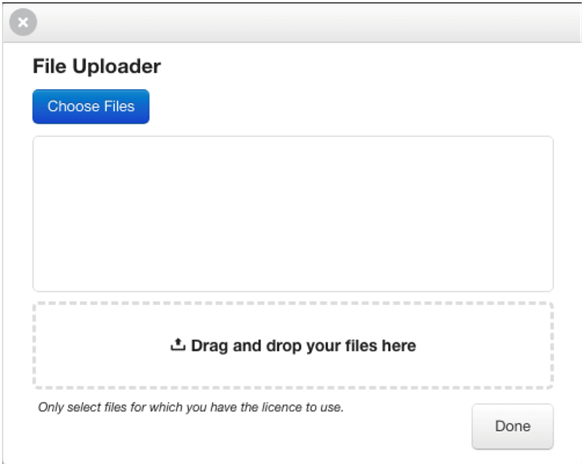
By default, Parent accounts do not have access to FrogDrive > Documents. Therefore, when a parent navigates to + > Add Resource, they will have the File Uploader pop-up window displayed to facilitate attaching files from their local device to the announcement reply.
When happy with the content of your reply, click the > button to submit your response.
Your response along with any attached resources, will be appended to the announcement, and the sender of the announcement notified of the reply.
Staff - View Announcement Replies
Now we will look at how staff can view announcement replies.
As mentioned previously, the blue badge will display on the Inbox icon within the Frog Bar when a new announcement is received. This also applies to when an announcement reply is received.
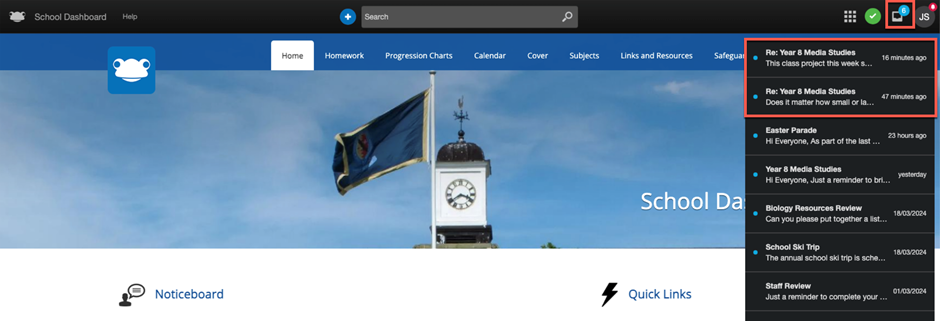
When the Inbox is selected a list of received announcements is displayed. New announcement replies will be indicated by the text Re: and a blue dot next to them
In the example below, we are logged in as a teacher and can see that the blue badge shows as 6 on the Inbox icon. Upon selecting the Inbox, we can see that the first two entries are announcement replies as they have the text Re: followed by the subject, start of the announcement reply and when the announcement reply was sent.
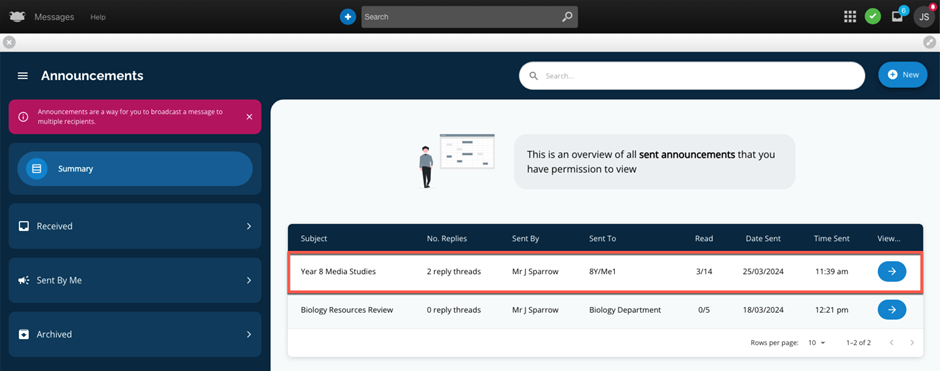
Alternatively, if you navigate directly to the Messages application via Quick Launch, the Summary will show at a quick glance information about the announcements you have sent. We can see that for the announcement Year 8 Media Studies, that the announcement has been read by 3/14 recipients and there are 2 reply threads.
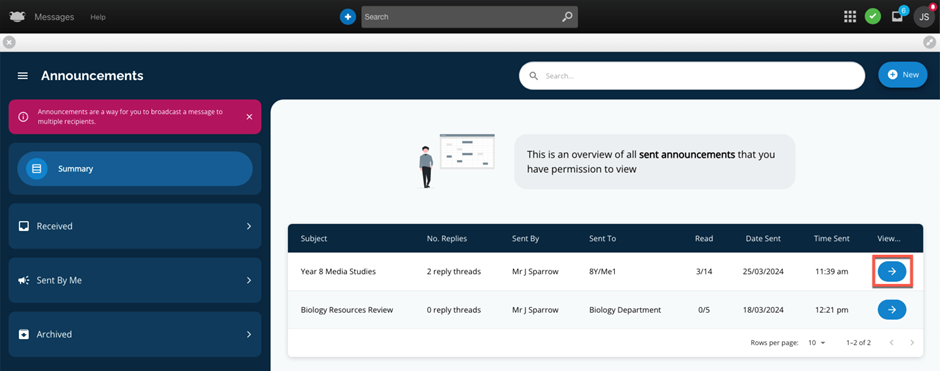
To view announcement replies, select the blue arrow button.
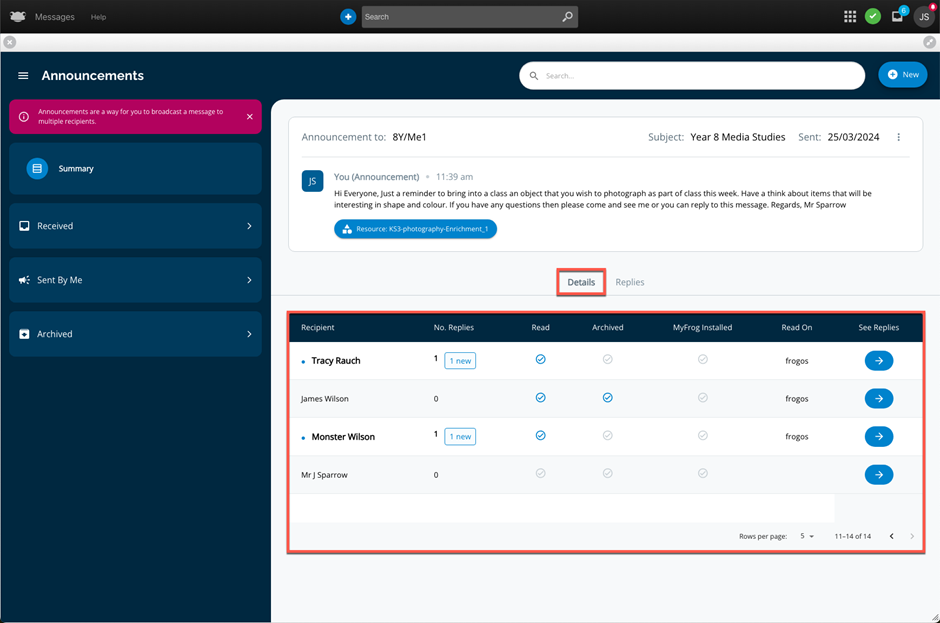
Details of the original announcement will be displayed at the top of the page. Further down though there are two sections:
- Details
- Replies
By default, the Details section is automatically selected. This section will display the following overview information
- List of the recipients to whom the announcement was sent.
- Number of replies sent by each recipient, along with a badge to show a new reply.
- Indication if an announcement has been read or archived by a recipient.
- Indication if the recipient has the MyFrog mobile application installed.
- Indication whether the announcement was read via the Frog platform.
To view an individual reply simply hover over the user. You will notice the entry shaded in a light grey and the hand icon appear; then click. Alternatively, you can select the blue arrow on the far right of the user.
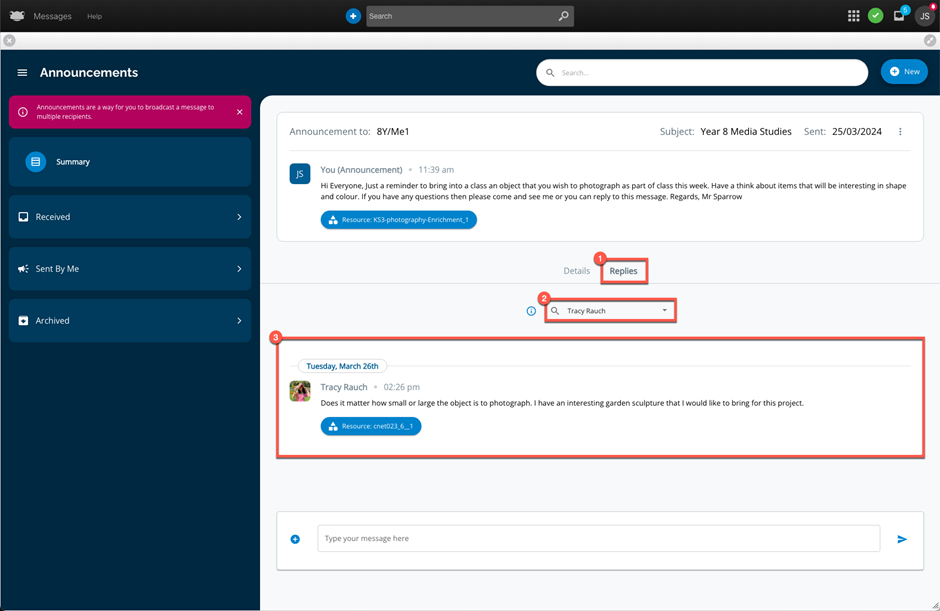
After selecting a user, the Replies section is highlighted, with an information icon showcasing the selected user’s name. Just below this, the user’s reply to the announcement.
In this example, we can see that the student Tracy Rauch sent a reply along with a resource on Tuesday, March 26th @ 2:26pm.
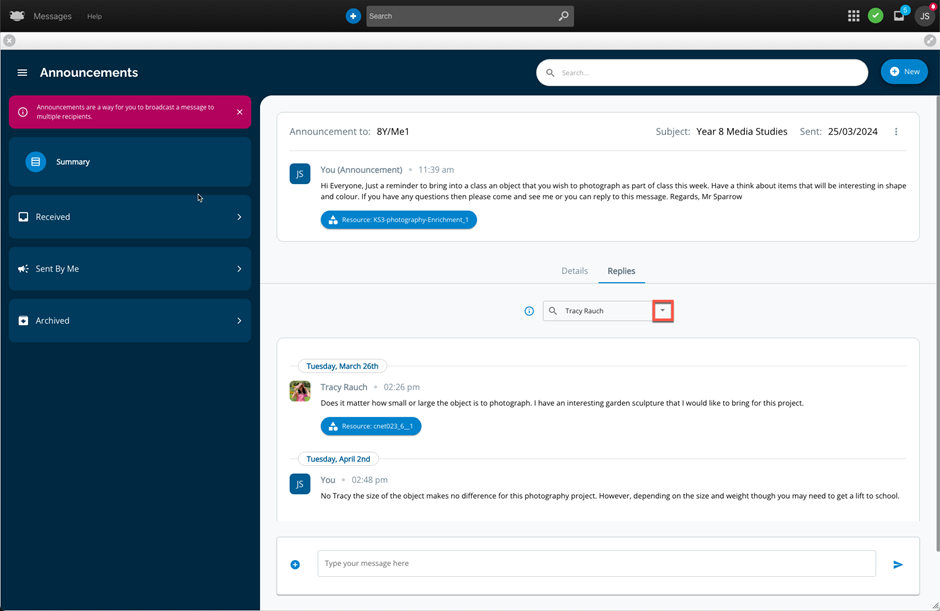
Should you wish to respond to a user’s reply, enter your response into the field at the bottom.
When happy with the content of your reply, click the > button to submit your response.
Your response will be appended below the user's reply, and the recipient who initiated the reply on the announcement will be notified of the reply.
All reply threads will display the date and time a reply is sent by both the recipient and the sender.
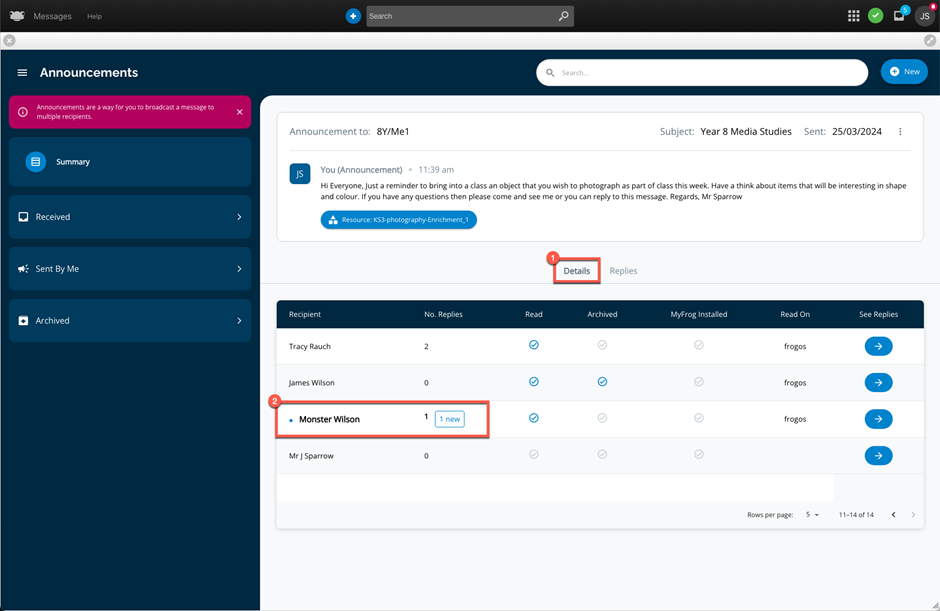
To view other new reply threads for the same selected announcement, navigate to the Details section and review the summary overview for each of the announcement recipients. New replies will be identifiable as follows:
- Blue dot next to the recipient that has replied. The recipient’s name will also be bolded.
- The text NEW displayed next to the reply count.
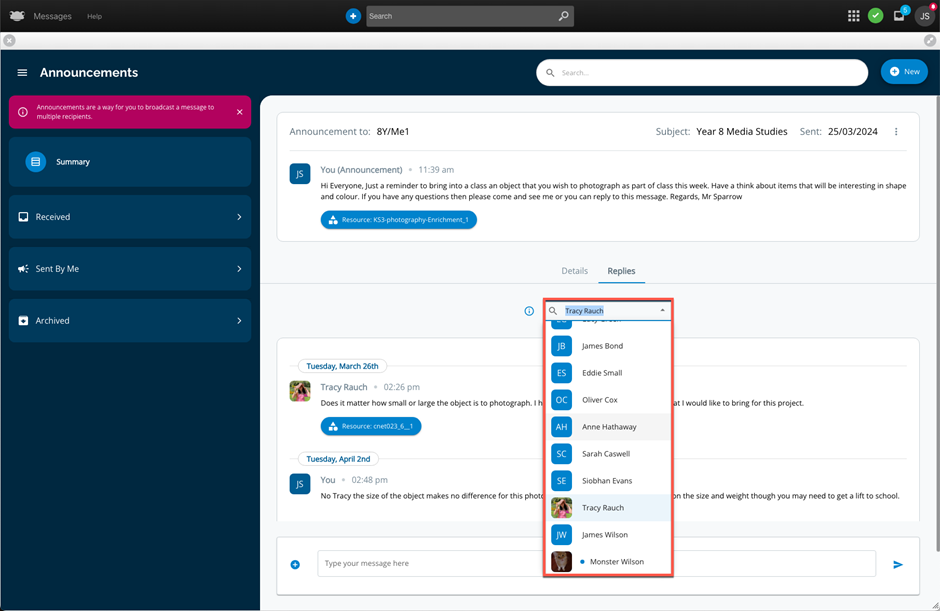
Alternatively, if we were still in the Replies section where we had just replied to a recipient (in this case, the response sent to the student Tracy Rauch), we could simply select the arrow next to Tracy Rauch.
A list of all the announcement recipients is displayed.
Any replies to an announcement can be identified by the blue dot next to a recipient’s name. In this example, we can see a blue dot next to Monster Wilson.
Selecting a user from the recipient list will allow you to view any reply threads, as well as enable you to send a direct message back to an individual recipient for the selected announcement.
At the beginning of this section, we showcased that navigating to the Inbox icon within the Frog Bar provides a quick view of received announcements as well as any replies. New announcement and new replies will be indicated by a blue dot, with announcement replies marked with the text Re: next to them.
If we were to select an announcement or reply from the Inbox list, the Messages application would launch, and you would be taken directly into the announcement / reply thread.
Staff - Archive Announcement (Sent by me)
All users (staff, student, and parents) can archive announcements. However, when staff initiate an announcement, they now have the option to allow for private replies. Therefore, some consideration also needs to occur regarding when replies to an announcement should stop occurring.
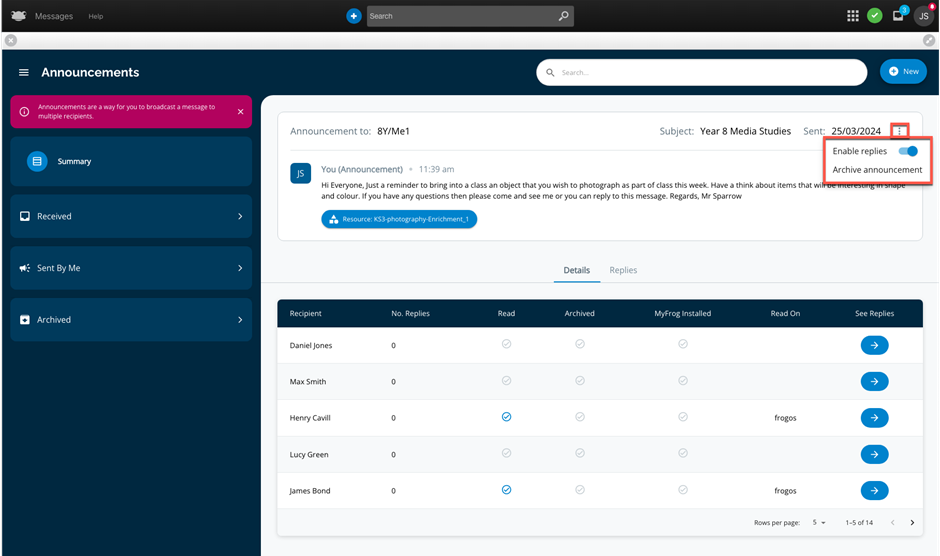
Within an announcement you have sent if you navigate to the ellipsis (three vertical dots) there are two options:
- Enable replies
- Archive announcement
In the announcement Year 8 Media Studies, we can see that replies have been enabled.
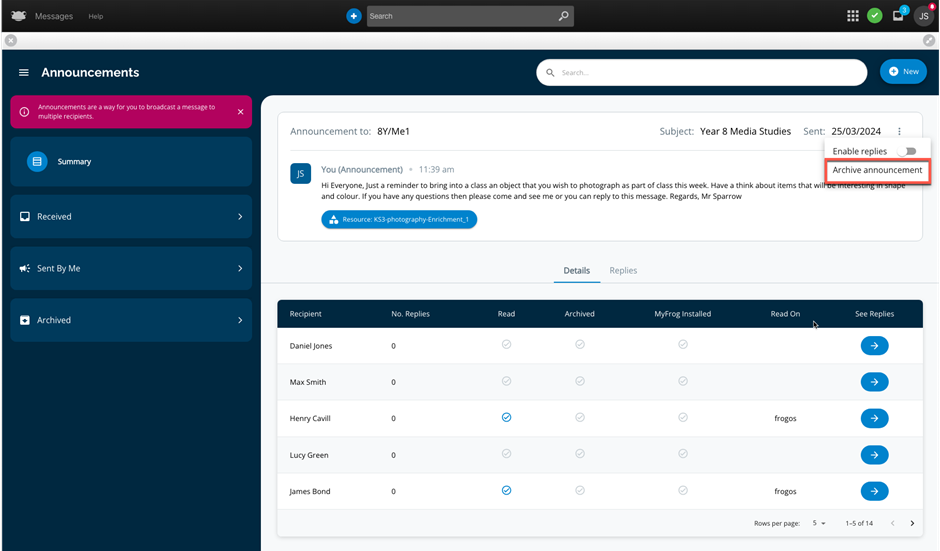
To disable replies for an announcement, move the toggle switch to the OFF position (indicated by a grey colour) for Enable replies.
Once replies are turned OFF, the action is applied immediately, meaning any recipients of the announcement will no longer be able to send a reply.
Now that we understand how to turn OFF replies for an announcement, we can proceed to archiving an announcement. It is strongly recommended that if you wish to archive an announcement, you first ensure that replies are turned OFF. The reason being that if this option is left on, recipients will still be able to continue replying, but you may not proactively review these reply threads within your Archived section.
If we use the announcement Year 8 Media Studies, and select the ellipsis (three vertical dots) we can see that replies are turned OFF. To archive this announcement, select Archive announcement.
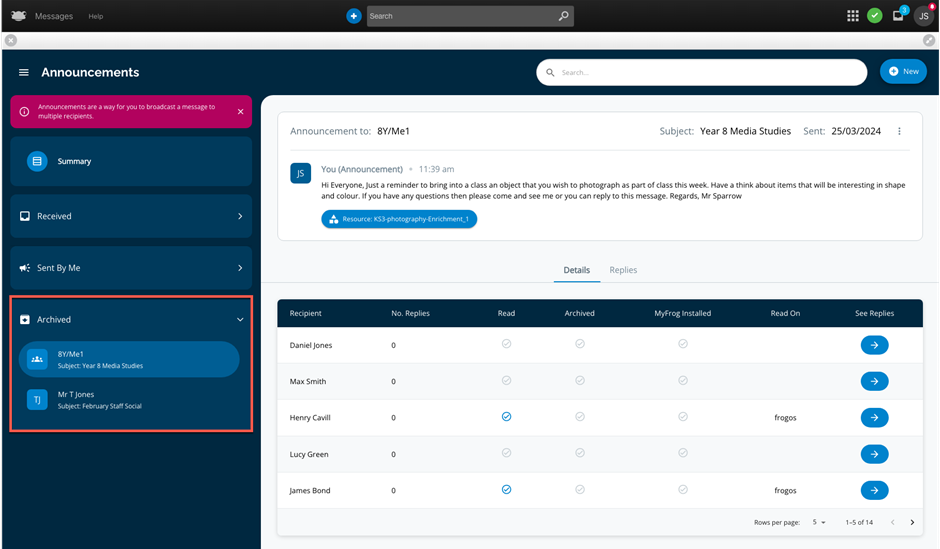
The Messages application will refresh, and if you were to expand the Archived section, you will now see the newly archived announcement Year 8 Media Studies displayed.
Please note that when an announcement is archived, it is only being archived for the individual. The announcement will still be displayed for recipients in their respective Inbox area unless they have opted to archive the announcement themselves.
Admin - View All Announcements (Summary)
We will now explore the Messages application from an admin perspective and the additional features available, including:
- Ability to monitor and view all sent announcements.
- Ability to delete an announcement.
- Ability to export reply threads for a selected announcement
Navigate directly to the Messages application via Quick Launch. When the application opens it will automatically display the Summary, which shows at a quick glance information about all announcements sent by staff within your school.
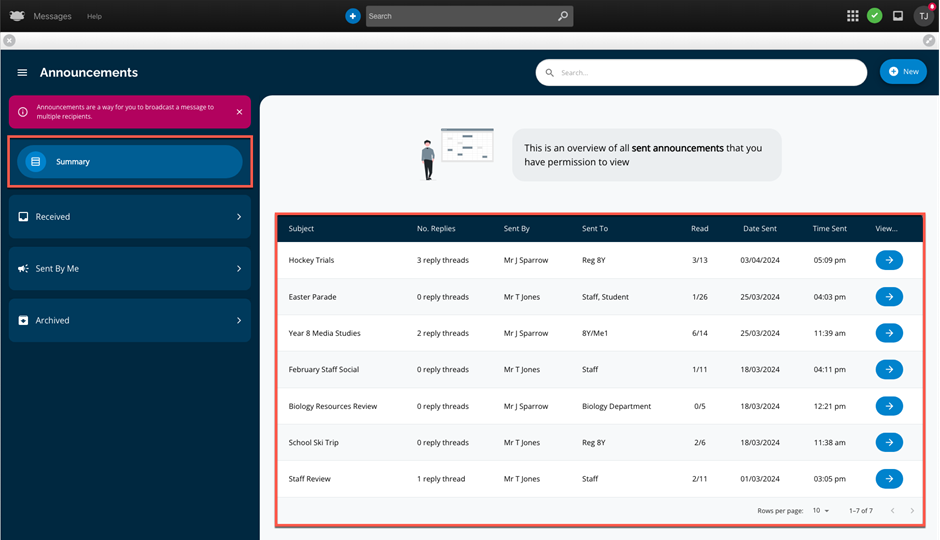
To view further information about an announcement or its replies, click anywhere on the announcement or select the blue arrow button.
The announcement Hockey Trials was selected, just like the staff member that created the message the admin will be able to see the details of the announcement displayed at the top of the page. Further down though there are two sections:
- Details
- Replies
By default, the Details section is automatically selected. This section will display the following overview information
- List of the recipients to whom the announcement was sent.
- Number of replies sent by each recipient, along with a badge to show a new reply.
- Indication if an announcement has been read or archived by a recipient.
- Indication if the recipient has the MyFrog mobile application installed.
- Indication whether the announcement was read via the Frog platform.
- Download icon facilitating a CSV export containing a summary overview for the selected recipient.
- NOTE – Currently the content of the reply threads is not included in the CSV. The export contains only a high-level overview of the date / time replies were sent and if they have been read by the originator of the announcement.
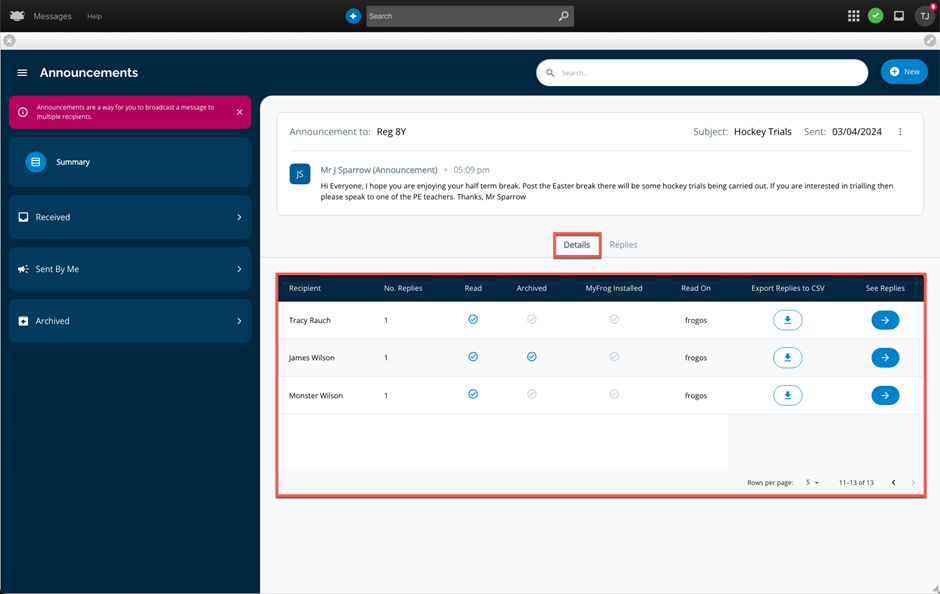
To view an individual reply simply hover over the user. You will notice the entry shaded in a light grey; then click. Alternatively, you can select the blue arrow on the far right of the user.
After selecting a user, the Replies section is highlighted, with an information icon showcasing the selected user’s name. Just below this, the user’s reply to the announcement.
In this example, we can see that the student Tracy Rauch sent a reply on Wednesday, April 3rd @ 5:10pm.
The only key difference between the admin viewing the announcement and the original sender is that the admin has no ability to either initiate a reply or send a reply to a reply thread.
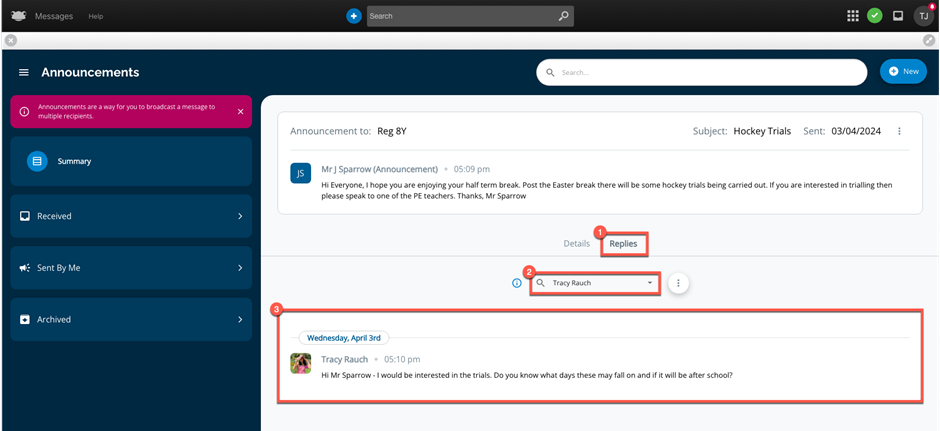
Next to a selected user there is an ellipsis icon. When selected, the admin has the option Export thread to CSV, which downloads a CSV export containing a message summary overview for the selected recipient. This option is the same as the download icon that is shown via the Details section.
Lastly, within the body of the announcement, if the admin navigates to the ellipsis (three vertical dots) there are the following options available:
- Enable replies
- Download reply threads as CSVs
- Delete message
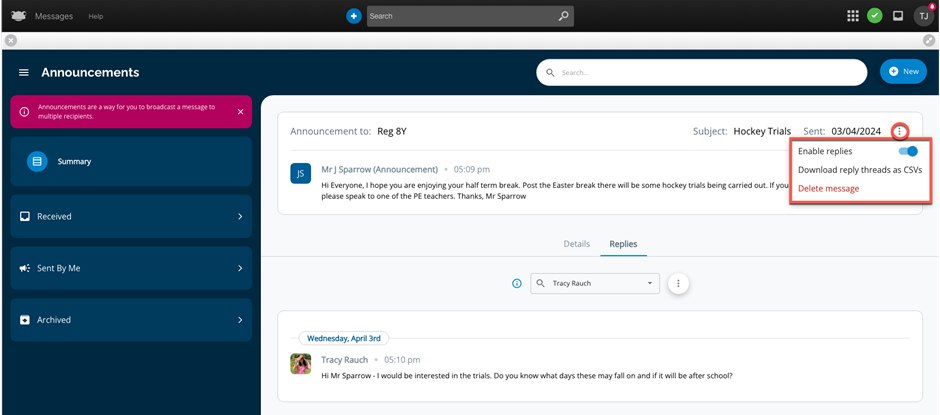
The admin will be able to enable or disable replies for an announcement by moving the toggle switch. For the announcement Year 8 Media Studies, we can see that Enable replies is turned ON (indicated by a blue colour).
Once replies are enabled or disabled, the action is applied immediately for the selected announcement.
The next option under the ellipsis is Download reply threads as CSVs. When this option is selected, a CSV export is generated containing a high-level overview of the announcement, including recipients, if the message was read or archived, and the total number of replies per recipient.
Lastly, the admin will have the ability to delete an individual announcement via Delete message.
NOTE – Admins should take careful consideration when opting to use the Delete message function. The delete is permanent, and the announcement along with all replies will no longer be visible on your Frog platform.
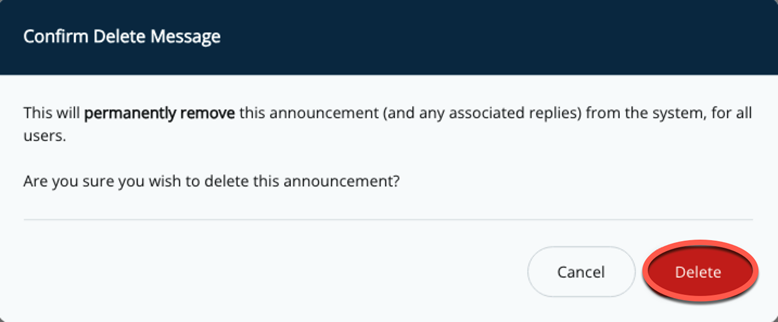
For a selected announcement, if the Delete message option is selected, the admin will have a Confirm Delete Message pop-up window displayed.
If certain that deleting the announcement is appropriate, select the "Delete" button. The action is immediately processed, and the announcement is removed from the Frog platform for the original sender and all recipients.
Admin - Frog App and Embedding of Messages Application
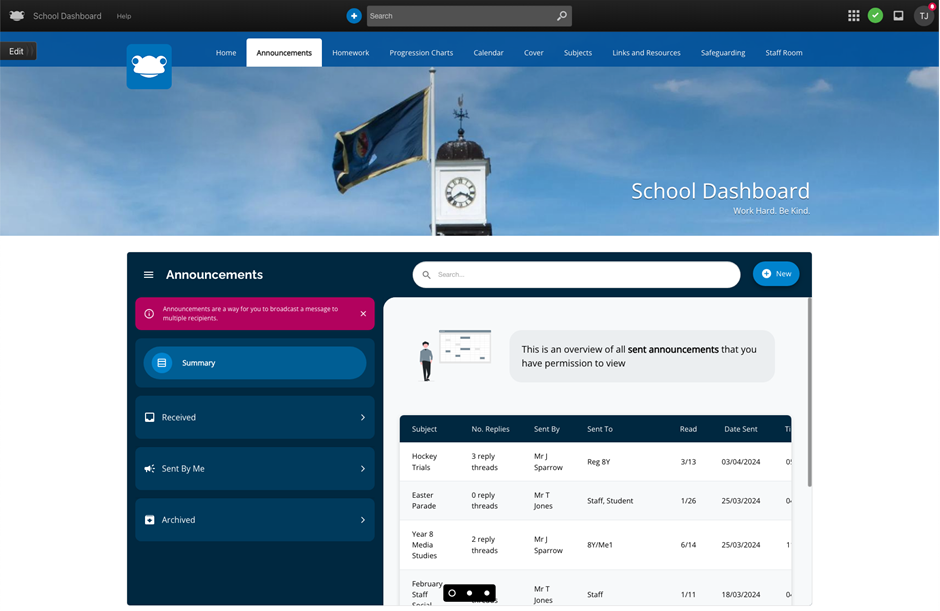
As part of the enhancements, the Messages application can now be embedded on a dashboard or site via the Frog App widget and be made available for student, parents, and staff to quickly view their announcements.
Depending on the page layout selected and where the Frog App widget is placed, the Messages application will be responsive and adjust its view accordingly.
Messages application within a full width box layout
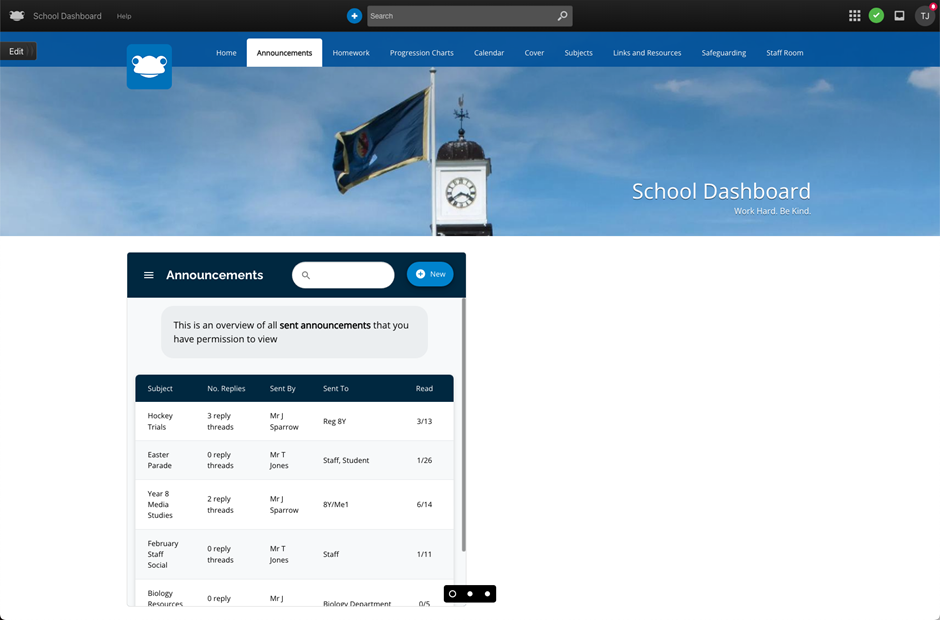
Messages application within a 1/2 width box layout
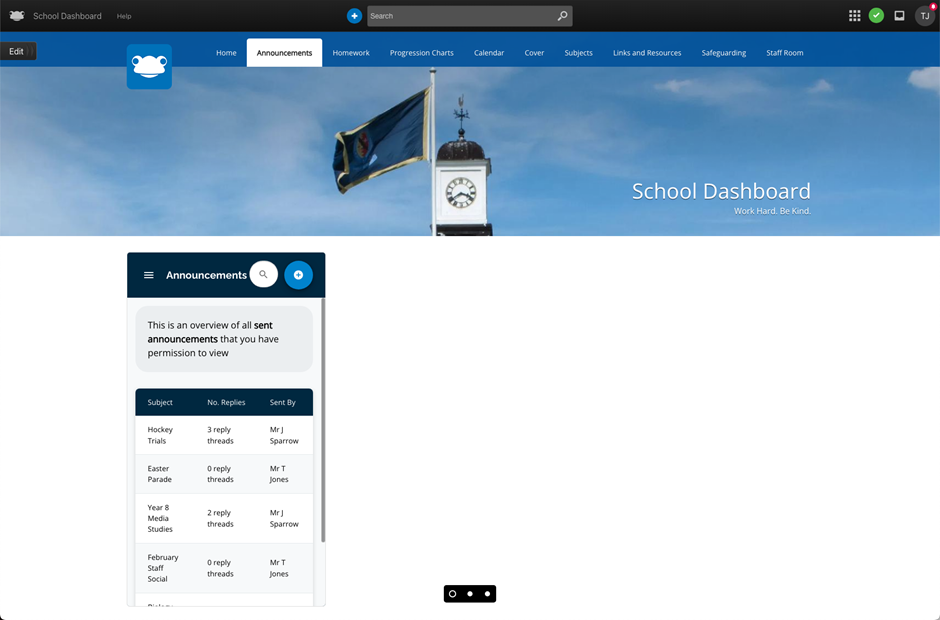
Messages application within a 1/4 width box layout
Chat
- Two-Way Communication: The Chat feature supports individual and group conversations, with data controlled by the school and stored within Australia for privacy and compliance.
- Embedding: The Messages application can be embedded on dashboards or sites using the Frog App widget, allowing easy access to chats for students, parents, and staff.
- Multiple Attachments: Users can attach multiple files to chats, including images (PNG and JPG) that are displayed inline for enhanced visibility.
- Notification Indicators: New chats are highlighted with notification indicators, ensuring users are promptly informed of new messages.
- Admin Management: Admins can monitor and manage chats, including deleting individual replies or entire threads if necessary.
- Automatic Messages: Schools can configure automatic messages to manage expectations regarding staff response times, reducing the burden on staff.
How to use Chat
Launching Chat
There are several ways you can get to chat:
- Quick Launch: Access the Messages application directly through the Quick Launch option in the Frog Bar.
- Inbox in the Frog Bar: When a new chat is received, a blue badge appears on the Inbox icon. Selecting the Inbox and navigating to the Chats header will display all received chats.
- Notifications: New chats or chats with unread replies are indicated by a small red badge, making it easy to identify and access them promptly
Creating a Chat
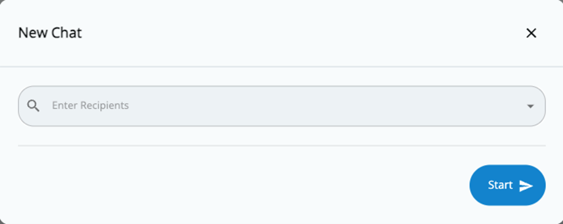
To initiate a chat, click on + New > Create new chat. The New Chat pop-up window will appear, allowing you to specify recipients. You can choose to chat with individuals or groups by typing a few letters of their name in the search field. Options include sending messages to just the user, their parents/carers, or both.
You can also create chats with groups. Groups could be roll classes, year levels or custom groups created in Frog. Enter part of the group name to find and select it. You can send messages to group members, their parents/carers, or staff associated with the group.
Viewing and Replying
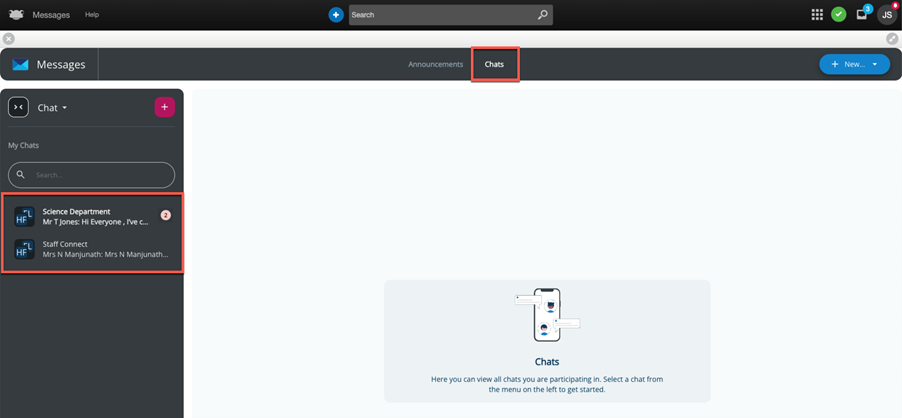
- Accessing Chats: Navigate to the Frog Bar > Quick Launch > Messages. Select Chats from the header to view all your chats. New or unread messages are marked with a red badge.
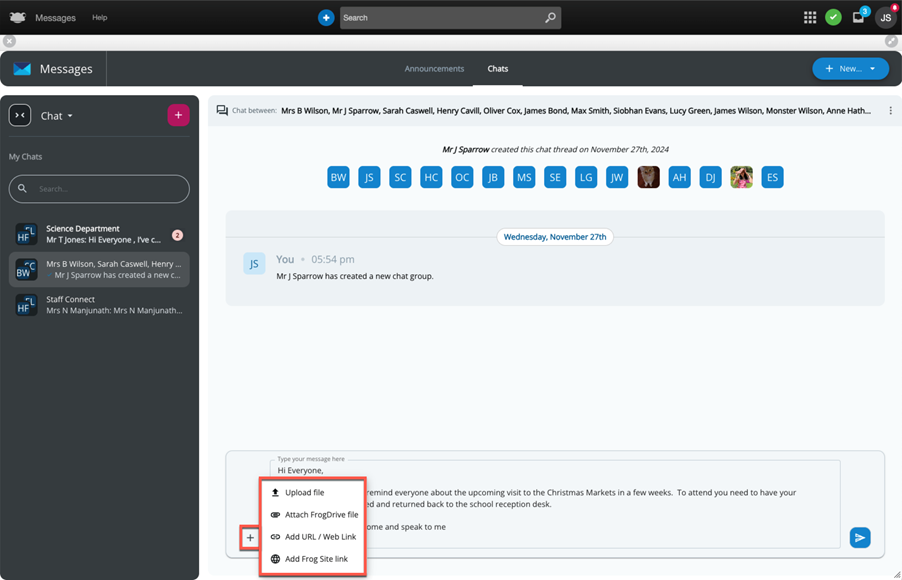
- Replying: Click on a chat to view details and send replies. You can add files, URLs, or Frog Site links to your messages. The reply field supports multi-line text for better readability. Click or tap on the send button to send a reply.
Additional Features
- Renaming Chat Threads: Staff can rename chat threads for clarity, which will be visible to all recipients.
- Search Functionality: The search field within the My Chats section allows users to find specific chats by entering relevant terms.
This new Chat feature is designed to streamline communication within the school community, making it easier for teachers to engage with students and parents effectively. Enjoy exploring and utilising this powerful tool!
For Frog Admins
Sending and Responding:
- Create Chats: Admins can create chats by selecting + New > Create new chat, specifying recipients, and sending messages.
- Manage Chats: Admins can monitor all chat threads, delete replies, and export chat data to CSV files.
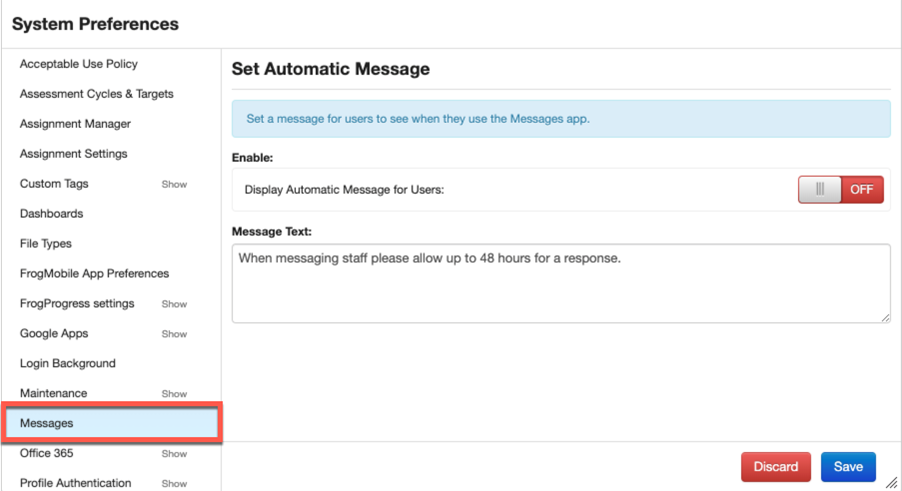
- Automatic Messages: Configure automatic messages to manage expectations on response times via System Preferences > Messages.
- Data Control: All chat data is stored within Australia.
- Management Tools: Ability to delete individual replies or entire threads and export chat threads.
Default Settings:
Admins have full access to all chat functionalities and management tools.
For Staff
Sending and Responding:
- Create Chats: Click + New > Create new chat, type recipient names, and select options like "This User Only" or "Members and Parent/Carer."Replying: Click on a chat to view details and send replies. Use the reply field to add text and attachments.
Default Settings:
- Staff can initiate chats and manage replies but cannot delete threads.
For Parents
Launching the Messages App:
- Quick Launch: Access through Quick Launch or the Inbox in the Frog Bar.
- Notifications: New or unread chats are indicated by a badge.
Sending and Responding:
- View and Reply: Parents can view and reply to chats initiated by staff.
- Initiate Chats: If enabled, parents can start chats with staff or family members.
- Default Settings:
- By default, parents cannot initiate chats unless the school enables this role.
For students
Launching the Messages App:
- Quick Launch: Access through Quick Launch or the Inbox in the Frog Bar.
- Notifications: New or unread chats are indicated by a badge.
Sending and Responding:
- View and Reply: Students can view and reply to chats initiated by staff.
- Initiate Chats: If enabled, students can start chats with family members.
Default Settings:
- Students cannot initiate chats unless the school enables this role.