Back to All Guides
GET IN TOUCH
If you would like to get further information about Frog or help in getting it set up in your school please get in touch via the contact details below...
hello@frogeducation.com
Assignment Manager
The Assignment manager application allows an educator to manage assignment activity within he Frog platform.
About Assignment Manager
The Assignment manager application allows teachers to view what they have assigned and the status of each assignment. It also provides access to the assigned work as well as allowing students to communicate with teachers to discuss the work or subject of the assignment.
The Assignment manager application can be launched from the Quick launch menu located on the Frog bar and will open in its own window.
Once open you will see 3 tabs:
- Open
- Closed
- Both.
Previously archived assignments will appear in the Closed tab.

Updates to assignment manager
As of August 2024, the Assignment Manager application has been enhanced to allow teachers to release marks for individual students within an assignment. Previously, teachers had to mark all students before releasing the marks overall. This improvement enables teachers to provide immediate feedback to students who complete their assignments early, supporting their personal learning journey. Read more about these enhancements on the following pages of this site.
Open & closed Assignments
Open assignments
When the Assignment manager application is initially opened, the application will display a list of open assignments. Assignments in this status have not yet been closed by the teacher of the assignment and are likely to be current. This may include assignments that have not yet been completed by the student or marked by the teacher.
Closed assignments
The closed tab contains previous assignments that have been closed by their issuer. Closing an assignment is a manual action that must be carried out by the user that set the work. An assignment that has been closed can be:
- Deleted
- Reissued
- Reopened
- Results exported to a CSV.
Filter assignments
You can also choose to filter the assignments in this view. Select the filter icon and then choose your filtering options. You can select to filter by:
- Name
- Subject
- Issue date
- Due date
- Recipients
- Mark scheme
- Handed in.

Viewing Assignments
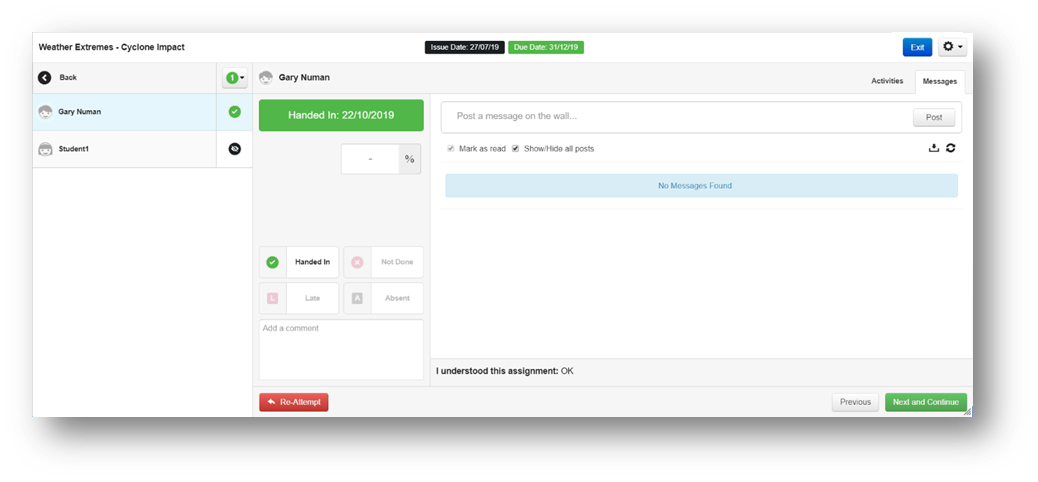
Selecting an individual assignment opens up the Student list view showing the status of each activity for every student who has received the assignment. Activities display a green tick when submitted, a percentage when marked, a white symbol with black background when unopened, and a red cross when overdue.
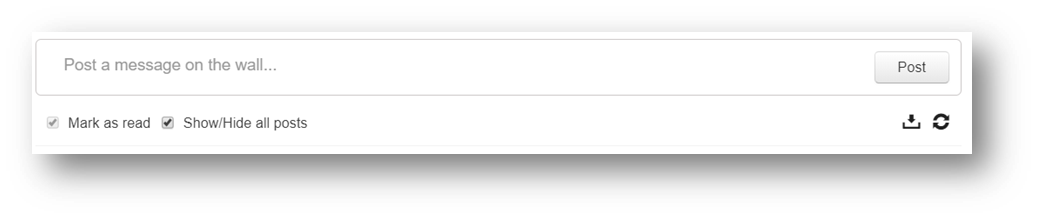
This page also contains a link to a comments wall for each student for the given assignment allowing you to communicate with students. This message wall will also show communication from assigned students to yourself and is also accessible to the student.
The overview of each student shown displays whether the student has worked on any activities, submitted the assignment, the date the assignment was submitted, a mark if given and the status of the assignment.
Selecting the Action cog on the top right of the application, you can take a closer look at a particular student’s current submission or status, edit, reuse or download files or message all students.
Enhancements to assignment manager
As of August 2024, an additional button is now visible below the comment section. This button allows you to publish the results of an assignment to an individual student while allowing you to continue marking the assignments of other students in your class. You can read more about how to do this in other sections of this site.

Marking Assignments
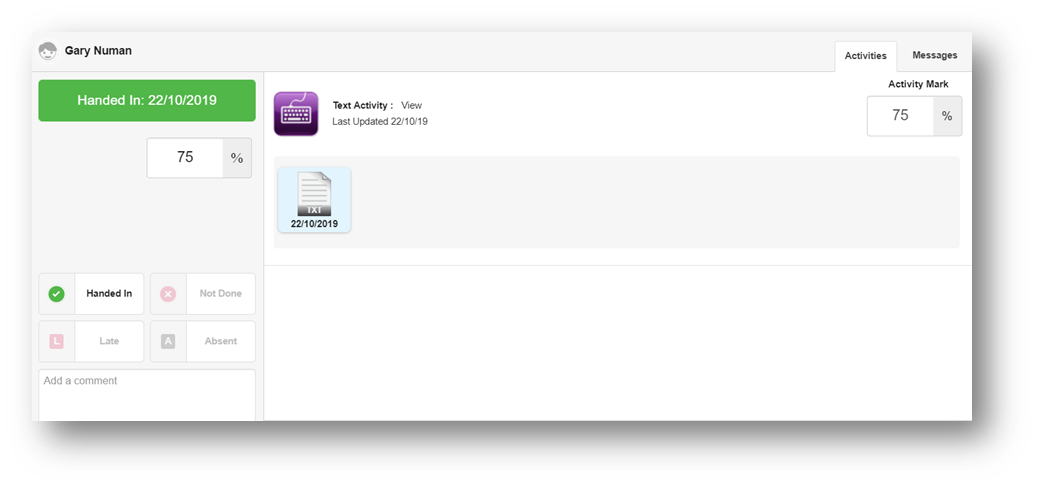
To mark an assignment, open the Assignment manager application and browse to the details of the assignment you wish to mark. If a student has completed the assignment and submitted their work, a green tick icon will be displayed in the activity column and a date will be displayed when handed in.
Select a student from the recipient list to view their submitted work. If Self evaluation has been requested, the user's feedback can be seen below the listed activities.
Saving marks and comments does not instantly pass these back to the user and an assignment must be closed and released before a user will see their marks. This allows you to mark submitted work over a period of time, but release the marks to all recipients at the same time.
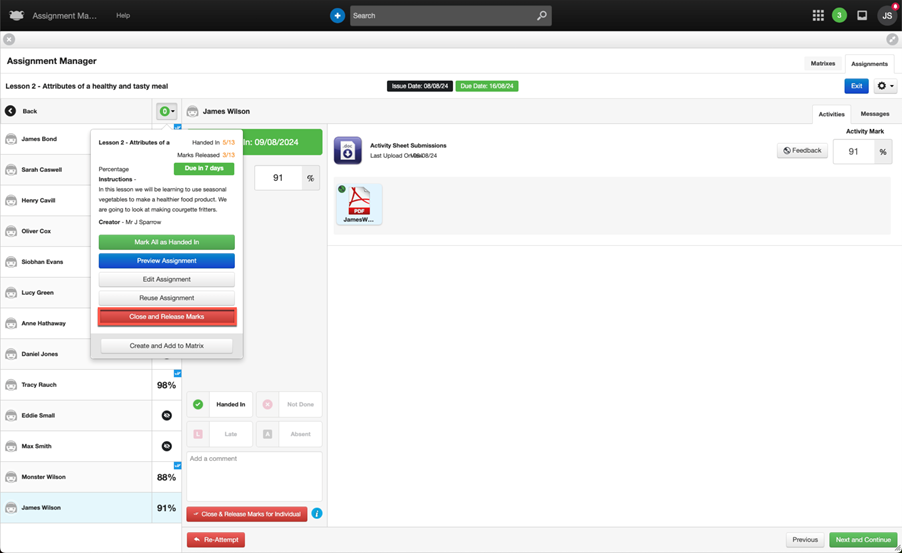
By selecting this icon you have more options:
- Mark all assignments as handed in
- Preview assignment
- Edit assignment
- Reuse assignment
- Close and release marks.
If you decide to change the marks you have given, you can always edit these fields and save your changes.
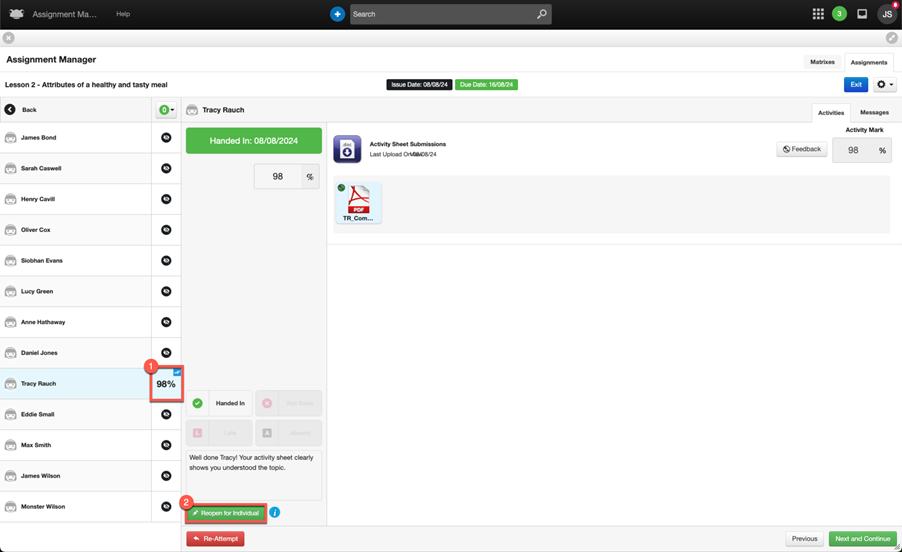
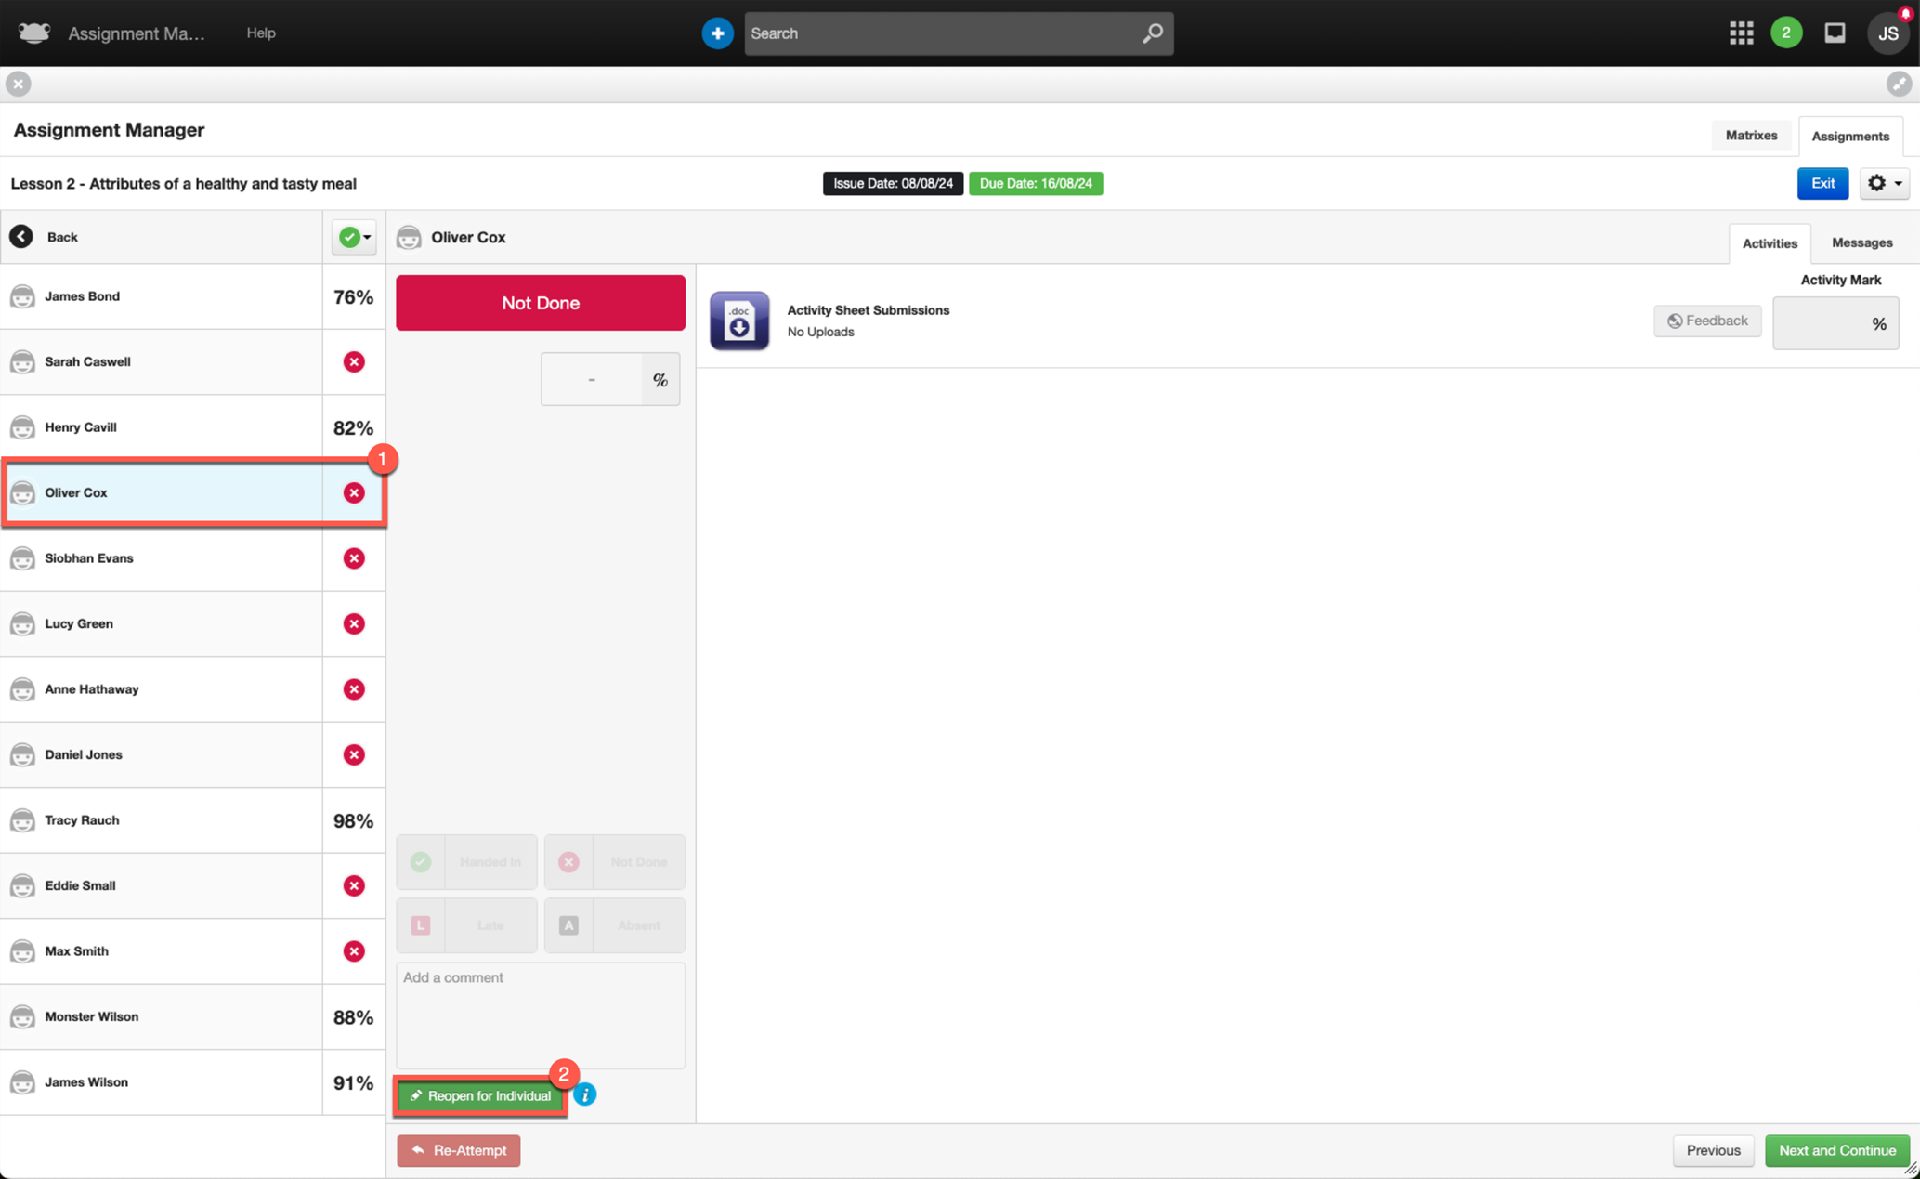
To release the marks for an individual student, select the Close & Release Marks for Individual button within the assignment.
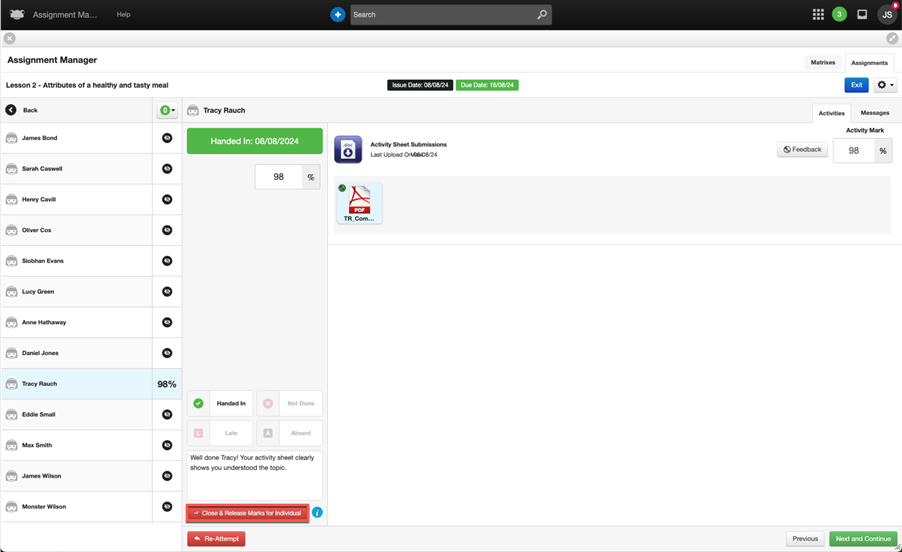
The assignment for the student Tracy Rauch will update, and you will notice the following changes:
- In the assignment status overview column, a blue tick will appear in the top right-hand corner. This new icon indicates that the marks have been released for the individual student.
- In the marking panel, the teacher will see a new green button labelled Reopen for Individual. This button allows the teacher to reopen the assignment for the selected student to adjust their marks.
Student notifications
When a student’s marks are individually released, they will first be notified via a notification on their timeline that their assignment has been marked.
If the student has the Notifications widget on their dashboard or navigates to the Profile Menu > Notifications, they will see two notifications for the individual assignment:
- One notification informing the student that the teacher has released their mark and what that mark was.
- Another notification advising that the assignment has been closed.
In the status overview column, we can see that students are in various states:
- James Bond, Tracy Rauch and Monster Wilson have had their marks released individually, indicated by the blue tick in the top right-hand corner.
- Oliver Cox and Ann Hathaway has viewed their assignment but not completed it, indicated by a greyed-out tick.
- Henry Cavill and James Wilson has had their assignment marked by the teacher and percentage displayed, but their mark has not yet been released.
- All other remaining students have not yet viewed their assignment, indicated by an icon of an eye with a line through it.

Communication with Students
If you wish to contact a student individually, you can do so by selecting the Message tab from the student’s row in the assignment view.
The message window will now be opened so that you can write and send your message. Enter the text of your message and then select the Post button.
This message will now be passed onto your student. You can view historical messages and responses from your student within the message window.
The message icon will also display a count of the messages for this assignment.
Closing Assignments
Once all assignments have been marked, the process is the same as before; navigate to the popover and select the Close and Release Marks button.
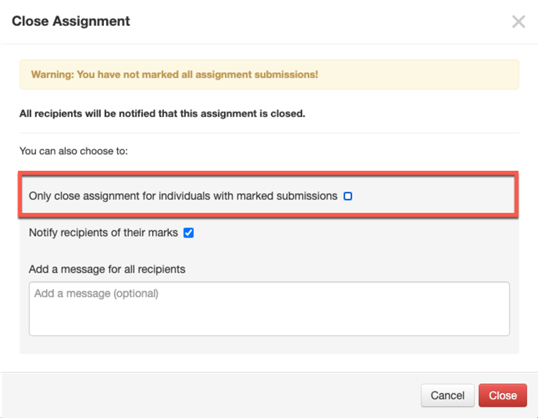
The Close Assignment popup window is displayed. With the ability to release marks for individual students, there is a new option within this window that allows the teacher to Only close assignment for individuals with marked submissions. This option enables the teacher to quickly bulk close the assignment for students who have been marked.
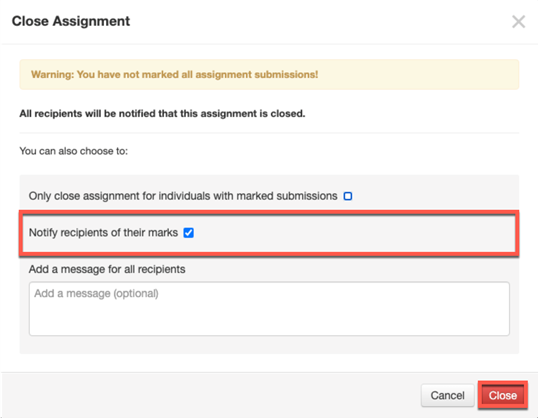
In this example, the assignment will be closed overall, even though some students haven’t been marked. The default option Notify recipients of their marks will remain selected, and then select the Close button. This action will close the assignment, and any students who haven’t had their marks released will be notified of their marks.
The teacher will be taken back to the assignment, and the following changes will be seen within the status overview column:
- Students (James Bond, Tracy Rauch and Monster Wilson) who had their marks individually released will display their mark but no longer have a blue tick displayed.
- Students (Henry Cavill and James Wilson) who had had a mark entered but not released individually will have their mark displayed.
- Students who have not completed their assignment will have a status of Not Done displaying a red cross.
When the teacher reopens an assignment for an individual student, a few differences will be seen. The first of these is within the status overview column, with the following changes:
- A blue tick will appear in the top right-hand corner for all students whose assignments remain closed with marks released.
- Students with an overall mark set will have their mark displayed.
- Students who did not complete their assignment (either not viewing it or viewing it but not handing it in) will have a status of Not Done, indicated by a red cross.

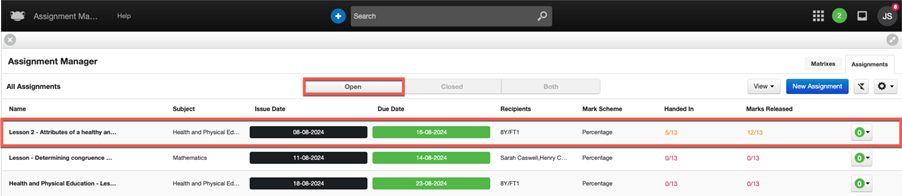
When the assignment is reopened for an individual student, the teacher will notice the following changes in the assignment list view:
- The assignment will now appear within the Open tab.
- The Marks Released column will show all marks released, excluding any students for whom the assignment was reopened individually.
In this example, the assignment Lesson 2 - Attributes of a healthy and tasty meal will display the Marks Released column as 12/13, since the assignment was only reopened for an individual student, Oliver Cox.
Matrix
Matrixes make it easy to create and manage assignments in Frog and support the tracking and monitoring of academic achievement. For all assignments a user can either create a new matrix and add assignments or assignments can be automatically added to an existing matrix that has corresponding details. To create a new matrix for your assignments you need to select:
- A class/Group
- Subject
- Year/Stage
- Mark scheme
- Academic year.
All future assignments that share these details will be added to this matrix.
Create a matrix
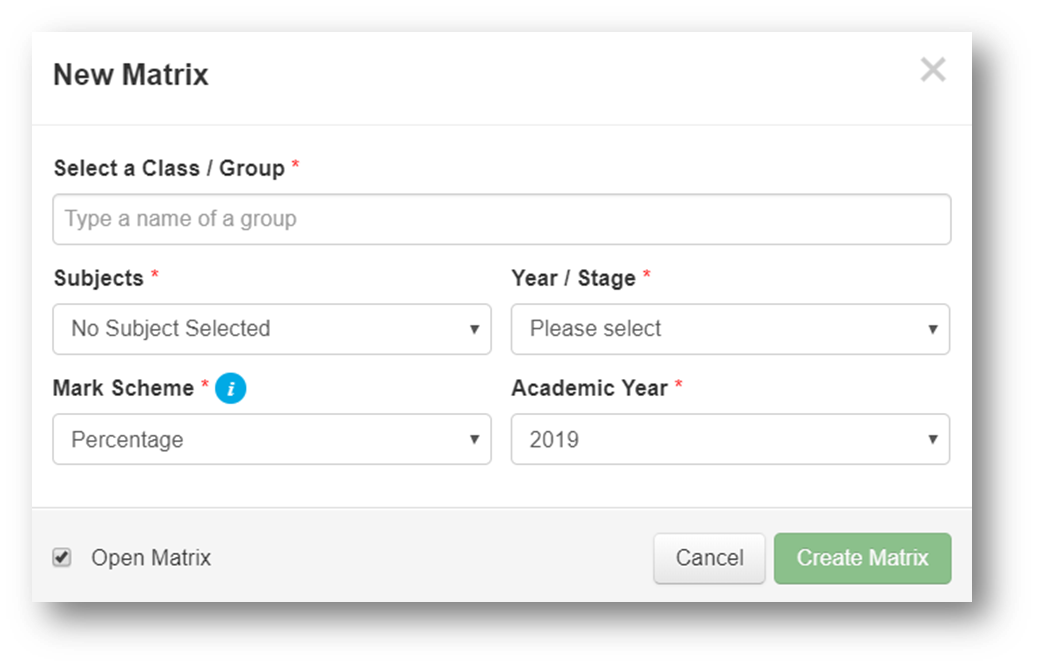
Firstly, you can create a new matrix. Select the New matrix button located at the top right of the application.
A new view will appear asking you to compete fields for your new matrix. You will need to determine the:
- Class/Group
- Subject
- Year/Stage
- Mark scheme
- Academic year.
When completed select Create matrix.
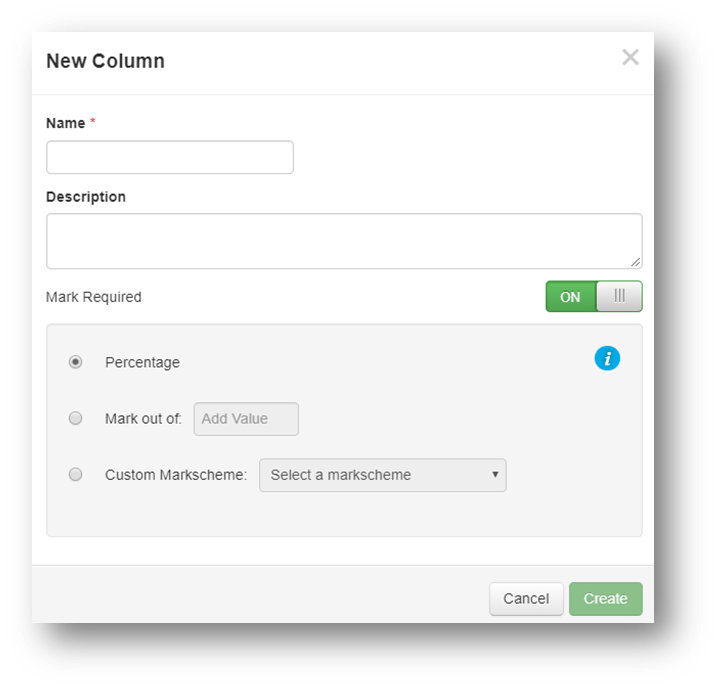
A new matrix will appear with the information from the previous view. You have the option to insert new columns to your matrix by selecting the Insert button.
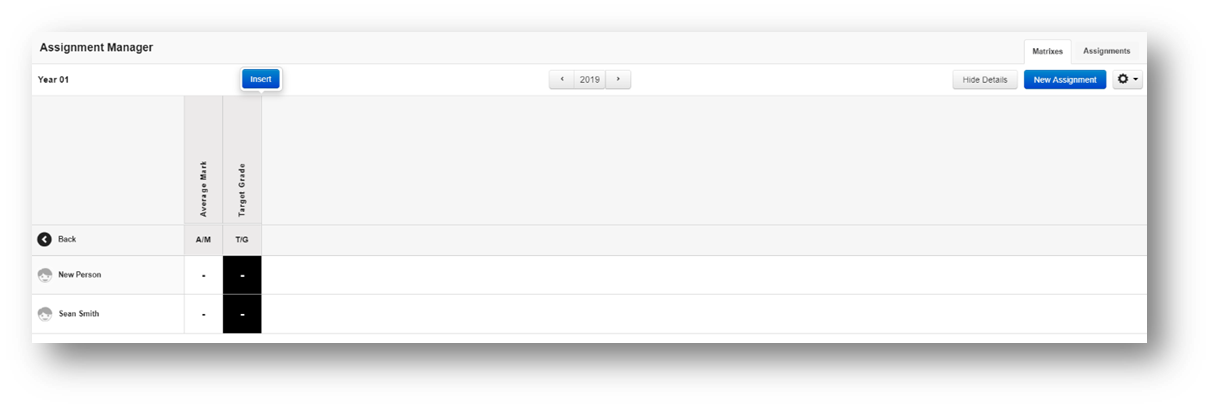
If you select the Insert button, you will be prompted to name your column, add a detailed description, the mark scheme required and finally select Create.
From your new matrix you can also create a new assignment that will import academic achievement into the matrix. To create a new assignment within your new matrix select the New assignment button.
A new view will appear that takes you through the assignment creation process. Aspects of the information required to create an assignment will be pre-populated so that it directly links with the matrix you are creating.
Once you have the matrix populated with assignment data, you can select the Action cog found at the top right of the application to manage your matrix and export marks to CSV.