Back to All Guides
GET IN TOUCH
If you would like to get further information about Frog or help in getting it set up in your school please get in touch via the contact details below...
hello@frogeducation.com
Progression Charts
Progression charts is a Frog application which is specifically designed to consistently assess and measure student progress and attainment.
Creating a Progression Chart
Progression charts is a Frog application which is specifically designed to consistently assess and measure student progress.
To create a new progression chart, navigate to the Progression charts application found within FrogDrive.
In the top right hand corner of the window there will be a New chart button.
Selecting this will open the Chart builder tool. You will then need to choose what curriculum, year, subject and teaching group you would like to create the chart for. When selecting this information if only one curriculum is active, this will be used automatically. If there is more than one curriculum active, you will have the option to choose which curriculum you want to choose. The curriculum settings can be changed within the Curriculum Designer application.
Your newly created chart will then be visible in your My charts area of the Progression charts application.
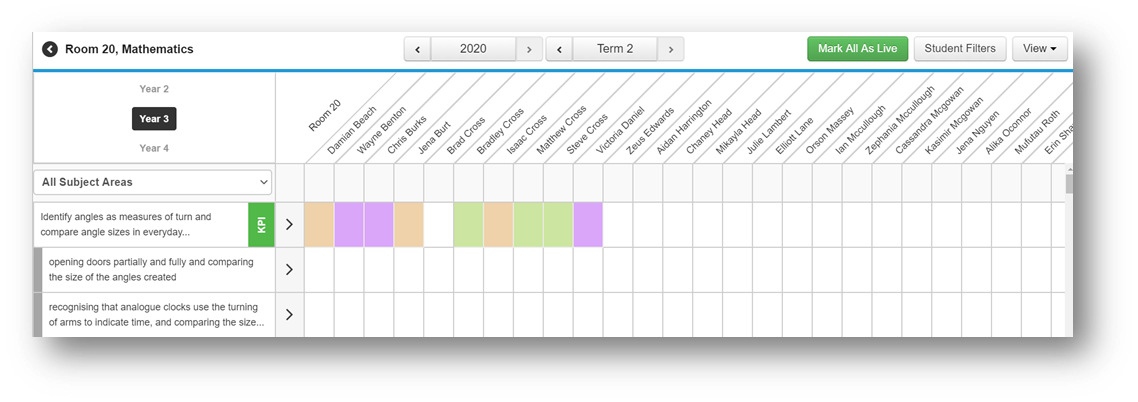
Viewing a Progression Chart
When you first open the Progression charts application, the default view is My charts, which will show you any charts you have created as well as any charts that you have added to your favourites. To change to view all charts on the platform or just your charts, use the View menu in the top right hand corner.
When charts are visible, it will display the subject, curriculum, class and which educator created the chart.
Selecting any of the charts will open it to display all student information as well as the learning objectives associated with the curriculum.
If there are multiple subject areas associated with your chart and you only want to view one, the drop down menu found above the learning objectives allows you to select one to view.
You are able to switch between cycles and years quickly using the options at the top of the chart.
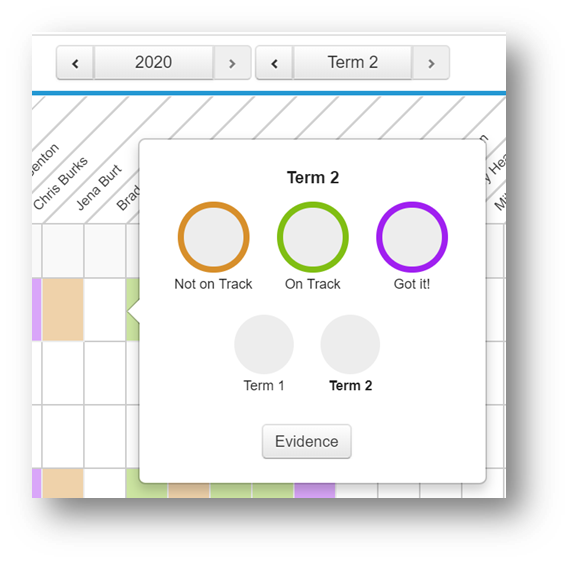
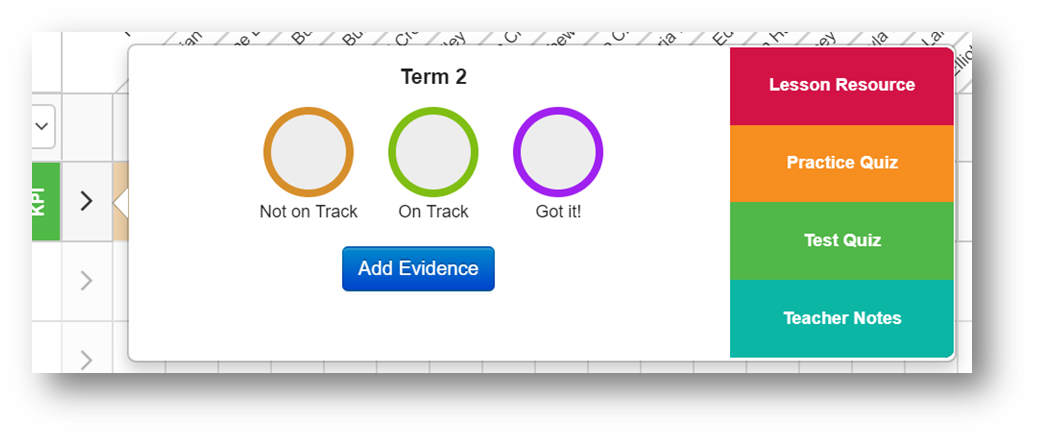
Judgements
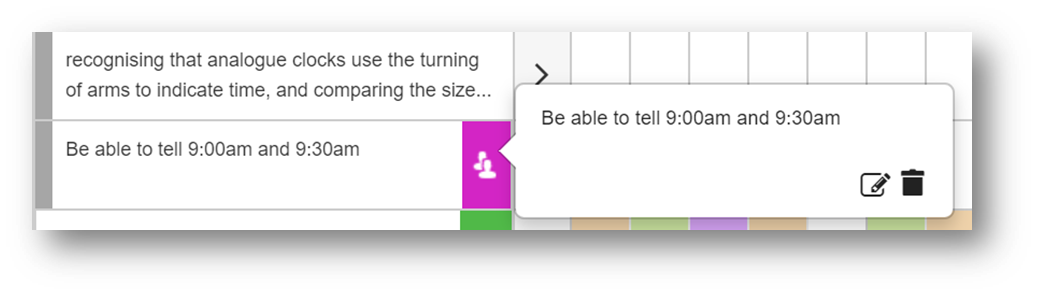
You can quickly make a judgement against a particular learning objective by selecting an individual’s box in the chart. From here, you can quickly make a judgement against a student to highlight how well they are progressing in this subject. These judgements are defined in the Curriculum designer. You will be able to see that the square for that student in the tracker changes to reflect the judgement you have made.
You can also make a judgement against a learning object for the whole group by selecting the arrow found to the right of the learning objective.
Quizzes in a Progression Chart
You can add a practice and/or text quiz to a progression chart's learning objectives to test students on their knowledge of a subject. There is no difference between a practice quiz and test quiz and are only named differently so educators can easily track any progress made from a practice quiz to a test quiz.
Adding quizzes
To add quizzes to a learning objective, select on the arrow to the right of the learning objective and then choose to add a test quiz or practice quiz.
Note: These quizzes are not automatically available to students and will need to be assigned before they can see them.
Assigning a quiz
Once a quiz has been added, you have the option to view the quiz or assign it from within the same area. This quiz will also be added into the Learning locker.
When you assign the quiz, it works in the same way as any other assignment in Frog and students will be notified that they have an open assignment in their My Frog area. The difference is that when the students complete it and it is marked and closed by the teacher, it will be added to their evidence timeline.
Removing a quiz
If you want to remove a quiz from a learning objective, you first need to open the Learning locker. You can open the Learning locker by selecting on the learning objective you want to remove the quiz from, then selecting the Learning locker option.
This will open the Learning locker window where you can see the resources that have been added to the learning objective.
Selecting on either of the quizzes will open a window where you can choose to remove the Quiz from the Learning locker.
Class Goals
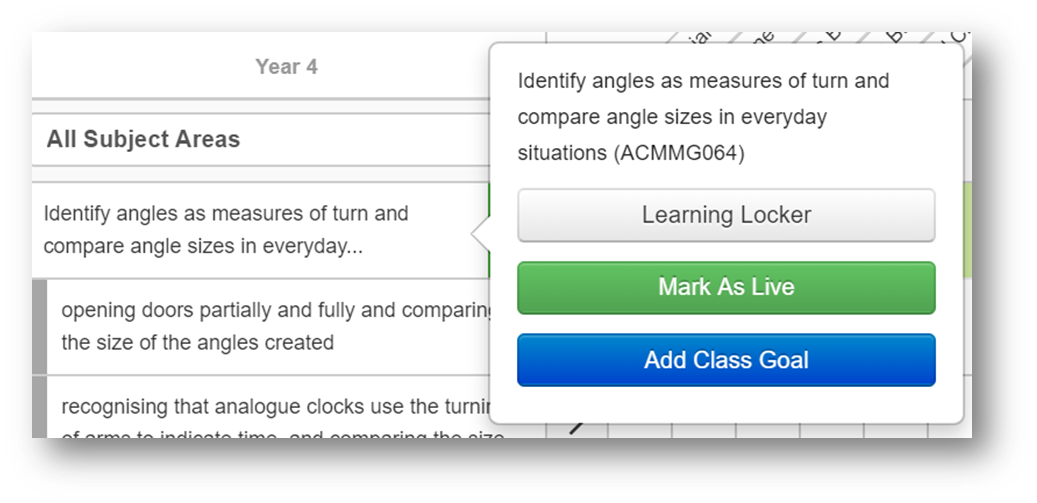
To add class goals to a learning objective, simply select the learning objective and select the Add class goal option.
Enter your class goal, select the Save button and the goal will be added to the learning objective.
Note: Students are not able to see this in the My learning application and is only visible to educators.
The new goal is easily identified by a purple thumbnail. You are now able to make judgements and add evidence to this goal in the same way you would with any other learning objective.
Edit or delete a class goal
To edit or delete a class goal, simply select on it and choose to edit the goal or to delete it.
Evidence
For each Learning objective evidence can be collected and displayed.
Adding evidence
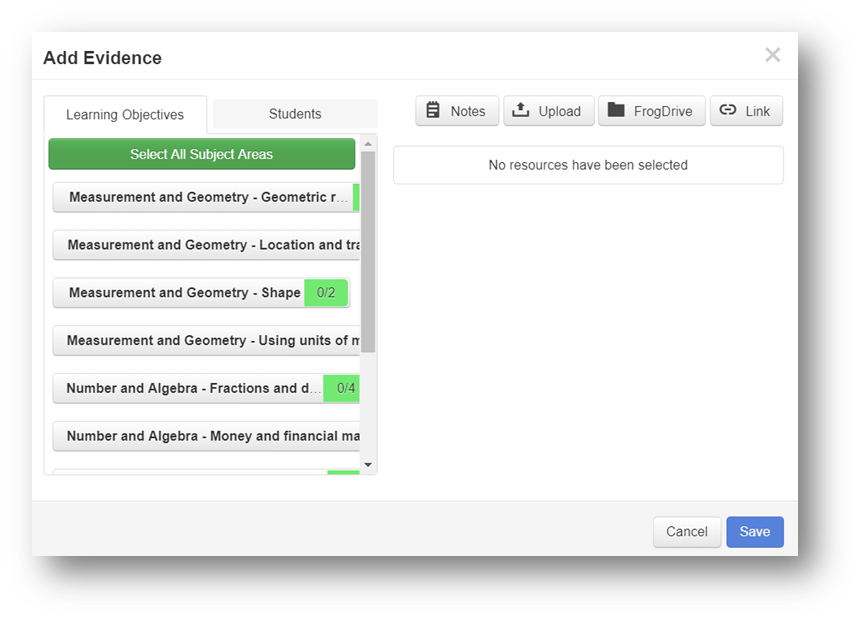
To add evidence against a student or students, open the Progression chart application and select the relevant student and learning objective. When the popover opens, select the Evidence button to be taken to the Evidence timeline.
Use the Evidence button to open the Add evidence window.
There are four different types of evidence which can be added in this window:
- Notes - Text notes which allow you to type in a simple statement as evidence
- Upload - Upload files from your computer or network as evidence
- FrogDrive - Attach files which have already been uploaded into FrogDrive
- Link - Attach a web link as evidence.
In subject areas with multiple learning objectives/KPI’s, the Learning objectives tab allows educators to attach evidence to multiple learning objectives at once.
It is possible to add evidence to multiple students in one go using the Students tab. Select the grey ticks next to the student names to turn them green and choose them to receive the piece of evidence. When you have chosen which pieces of evidence you wish to add, it is possible to add a comment to each piece of evidence for further explanation if required.
Viewing evidence
When evidence is added to a student's learning objective, it will be added to their Evidence timeline. When looking at the progression chart, evidence counters are added to highlight that students have evidence on their timeline. The number in the counter will highlight how much evidence has been added to the timeline.
Selecting the box with the counter and then selecting the evidence button will take you to the Evidence timeline of this student.
Removing evidence
You can remove evidence from within the Add evidence window as well as when viewing a student's Evidence timeline. To remove evidence from the Add evidence window, simply select the cross to the right of the evidence.
To remove evidence from the Evidence timeline, select the relevant user and learning objective and then select on the evidence button. This will display the users Evidence timeline. Select the evidence you would like to remove and from the action cog menu, select the Remove from evidence option
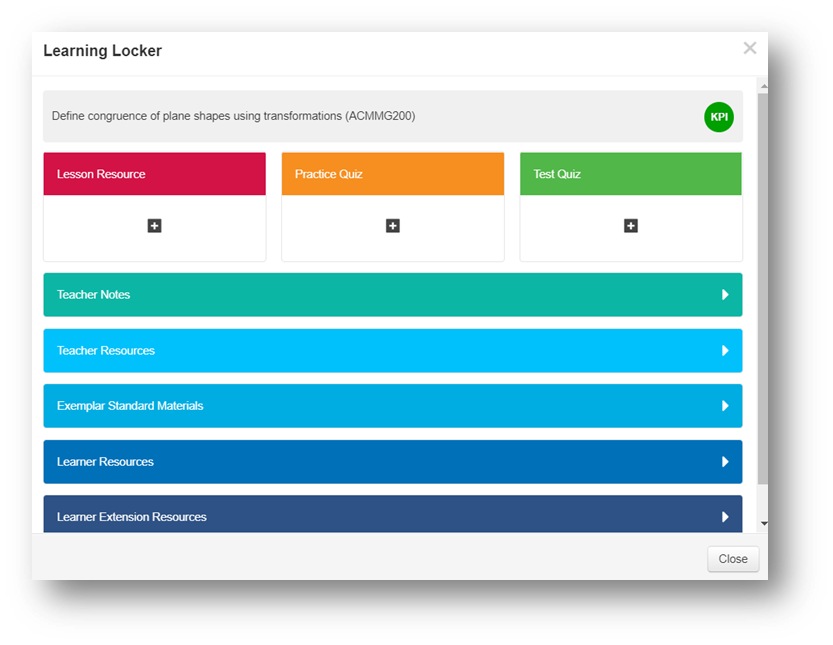
Learning Locker
The Learning locker is accessible through both the Progression charts application and the Curriculum designer. It is used to add resources to learning objectives within the curriculum to aid educators and students throughout the school year. To access the Learning locker, simply select on the learning objective you want to add resources to and select the Learning locker option.
You are able to assign resources such as sites, documentation and quizzes to students which when marked, will be added to their evidence timeline. Resources added to the Lesson resource, Practice quiz and Test quiz can all be assigned to students.
Note: These resources will only be visible to the students once they have been assigned. To add resources to these areas, simply select the + button.
Remove resources by selecting on them and selecting the remove option.
Below this area in the Learning Locker, it's possible to add more resources and information for educators. The options are:
- Teacher notes - Add notes to this area
- Teacher resources - Add resources such as sites, documentation, quizzes and links related to this learning objective
- Exemplar standard materials - Add exemplar standard materials to this area.
Any resources added to the following two options are visible to students through the My learning application.
- Learner resources - Add resources such as sites, documentation, quizzes and links related to this learning objective
- Learner extension resources - Add further resources such as sites, documentation, quizzes and links related to this learning objective.
Adding lesson resources
You can add resources to progression charts to help students reach their targets. You can add documents, videos, sites and even quizzes as resources to an objective and then assign these to students to ensure they utilise this resource. To add a lesson resource, open a progression chart and choose an objective you want to add a resource to. Select the arrow to the right of the learning objective will open a pop-up.
Within this pop-up is the option to add a Lesson resource. If you already have a resource added to this objective, selecting the Lesson resource button will allow you to view it or assign it to students. If you are adding a new resource, you will need to select the Add resource button.
Once you have uploaded a resource, you can add notes for the students if necessary by selecting the Add notes button. You can also add notes when viewing the resource.
After selecting save, your resource will be added and you can then view it or assign it to students.
Removing resources
To remove a resource, open the learning objective options by selecting the arrow to the right of the learning objective and then select the Lesson resource button. You then need to select the View button to open the attached resource. From here, you can simply select on the Remove button at the bottom of the window.
Viewing and Filter options
There are a number of ways you can manage the view of a Progression chart.
Live objectives
Marking objectives as Live means that students and parents can see these objectives in the My learning and My child's learning applications. This is useful as students and parents can easily see what the key learning objectives are at any given time, rather than across the whole year.
To mark an individual learning objective live, select it and choose the Mark as live option.
Any live objectives are easily visible as a blue Live thumbnail will be added to the row.
To mark all objectives as live, simply select the Mark all as live button in the top right hand corner of the window.
Applying a filter
When viewing Progression charts, you may want to add student and contextual filters for certain student groups. To do this, select the Student filters button in the top right hand corner of the chart.
When selecting this button, the filter window is displayed. You then need to select the checkbox next to the data filters you wish to have applied to the tracker. Once you are happy with your filters, select the Apply filter button.
Multiple data filters can be applied, however, you need to be aware of the logic in how the data will be presented back. The logic applied when selecting multiple contextual data filters is AND logic. For example, you select the checkbox for the SEN and EAL filters and have these applied. Only students that were in both the SEN and EAL groups would be displayed. Students that only existed in one of the groups, either SEN or EAL, would not be displayed.
To remove the filters, simply un-check them or select the Reset filter button.
View options
When viewing a progression chart, you are able to change what information is displayed by navigating to the View button found in the top right hand corner of the window.
Changing what learning objectives are displayed
From the View drop down menu, you can choose one of the following options:
- Live only - Select this option to only display the learning objectives that have been made live
- All objectives - This will display all objectives whether they are live or not
- KPI only - Choosing this option will only display the KPI learning objectives.
Changing assessment status view
The Assessment statuses that have been set up in the Assessment standards area of the Curriculum designer can impact how Progression charts are displayed. For each status, there will be a colour, a text based status and a numerical value.
From the View drop down menu, you can choose one of the following options:
- Colours - This will only display the colour associated with the assessment status
- Values - This will only display the numerical value associated with the assessment status.
- Both - This options displays both the colour and the value associated with the assessment status.