Back to All Guides
GET IN TOUCH
If you would like to get further information about Frog or help in getting it set up in your school please get in touch via the contact details below...
hello@frogeducation.com
Calendar
Displays a calendar you can manage in Frog.
Top Navigation
The Calendar application in Frog allows you to efficiently create entries, view entries and even share calendars with other users. The Calendars within Frog can be accessed by selecting the Quick launch icon on the Frog bar. From the dropdown menu, select Calendar to be taken to your Personal calendar area.
At the top left of the Calendar application is the New button to add a new event and to the right of this is the Print button.
In the central area of the top navigation is a Search function for the calendar where you can filter down the events booked on your calendar. By searching for a specific term you will notice that only events booked that contain the word or string of text that you are searching for in your current view, will be present on your calendar.
Note: This feature is not case sensitive. The search is carried out as you type, you do not need to submit your search. To remove your filtered entry, select the small red-cross to the right of this box. By default the calendar will be set to display the week view.
Left Navigation
On the left of the calendar view is the option to select the current day, week or month that you wish to view (Note: This is dependent on the selected calendar view).

Underneath this is the option to select Today, which will show you today's date.
Next to this is the Go to date option that when selected displays a white entry bar. If you select in this area a small calendar will appear beneath this. If you navigate to the particular date required using the year and month dropdown boxes and by left selecting the specific day, the small calendar will recede and the date will be entered into the white box. By selecting Go, your main calendar will now display the selected date.

In the left hand panel of the calendar area is the My calendars and Other calendars areas
Calendar Settings
On a calendar you can administrate, select the small arrow to the right of the calendar name to display additional settings;
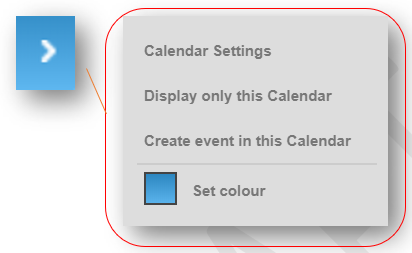
- Calendar settings - Opens up the settings for this calendar in the main calendar area
- Display only this calendar - Will only display the selected calendars entries on your calendar
- Set colour - Allows you to change the colour of this calendar for the user you are currently logged in as. You can choose one of the default colours from the palette or enter a colour code for a specific colour.
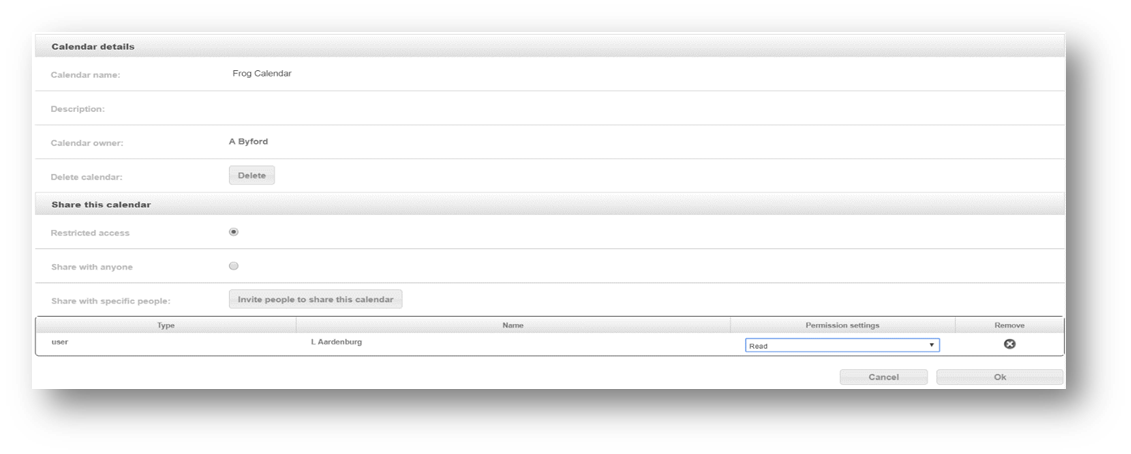
On the Calendar settings page for your personal calendar you cannot share the calendar, rename it or even delete it. For a non-personal calendar you can view the following settings;
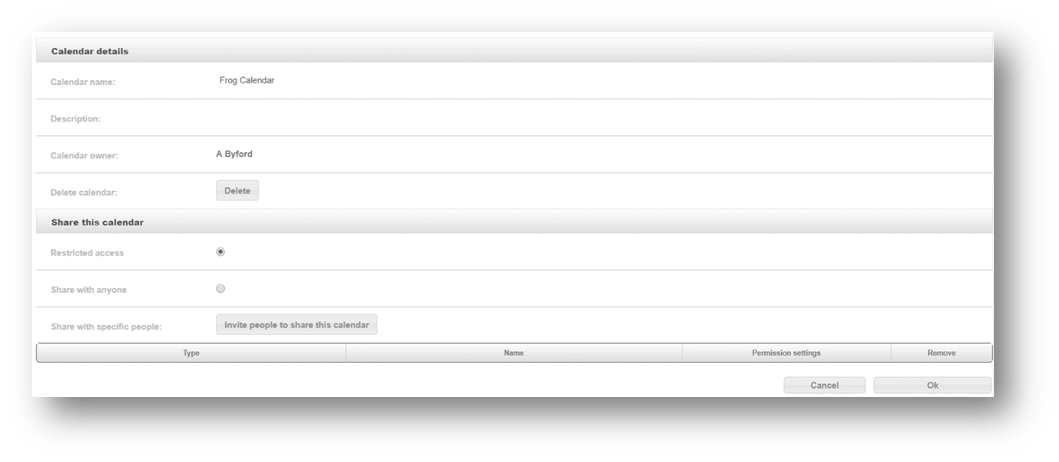
Calendar name - View or change the calendar name
- Description - View or change the calendar description
- Calendar owner - Lists the calendar owner
- Delete this calendar - Providing this is not a personal calendar and you are an administrator of a calendar, there will be a delete button present to delete this calendar.
The three settings under Share this calendar are radio buttons where only one may be selected.
- Restricted access - If selected this will prevent any users from seeing this calendar, apart from those you share it to (see Share with specific people later)
- Share with anyone - This option would allow for public calendars
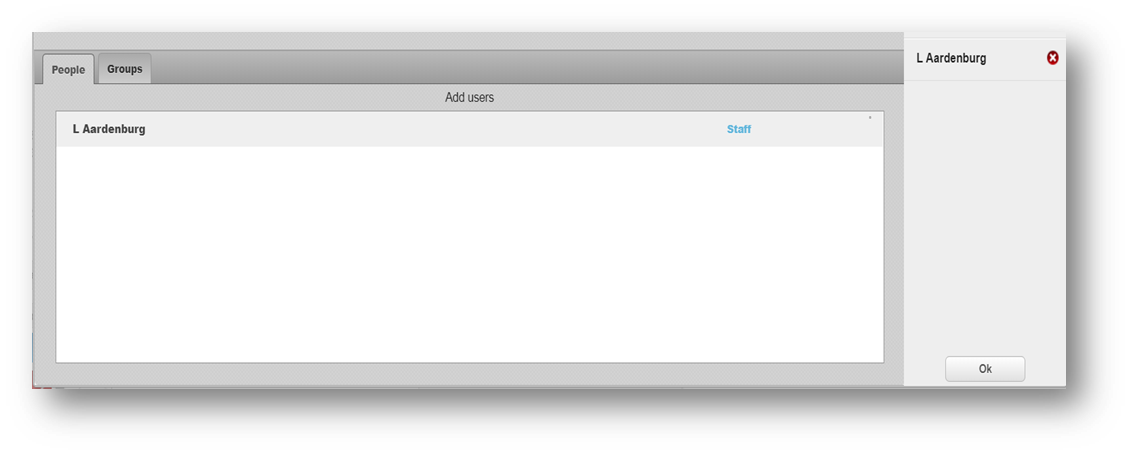
- Share with specific people - If you select the Invite people to share this calendar this will open up another popup window where you can undertake a search for users or groups to share the calendar with. You can type a user’s name or a group name and the search results will display in the area below the entry. By selecting the add button beside their names will move them over to the right hand panel of this popup window. To remove users from this panel select the red-cross beside their name. Select OK and you’ll be returned to the calendar settings page. These selected users will then be placed in the permission settings area below. Below this area is a table listing all users that have had this calendar shared with them. To the right of the users name is a permissions settings column. From this dropdown you can choose Read or Admin. If a user is set to Read, they can simply view this calendar and it will appear on their Other calendars area on the left panel. If a user is set to Admin they will be able to book events, make changes to events, share the calendar and generally modify the calendar settings.
Creating a New Calendar
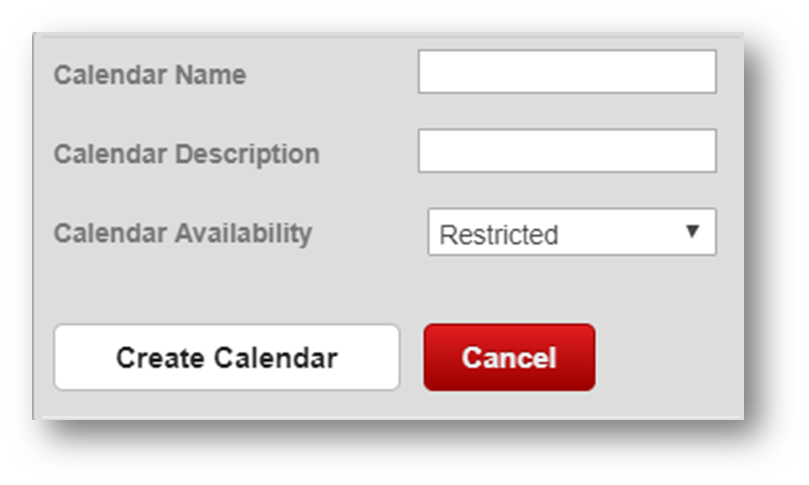
If you wish to create a new calendar you can do so by navigating to the left hand calendar panel and select the Add button below the My calendars area. This will present you with a small popup area above this button which allows you to specify the calendar name, description and availability. The availability is selected from a dropdown menu. You can then select Create calendar in order to action your request.
Creating an Event
You can create a new entry in your calendar by selecting the New button at the top left of the Calendar or by selecting the Calendar menu from the Calendars list and then selecting the Create event in this Calendar option. You can also create a new booking by selecting a time period in the calendar view.
When you carry out any of these actions the New booking dialog will be displayed. The settings available for entry are as follows:
- Event title - Select New event on the darker popup heading to enter a desired event title
- Location - Here is a text box for you to enter a location for this event
- All day - Here is a checkbox you can tick for an all-day event.
- Start & End time - By selecting this area the popup window will slide to the right and you can select a specific start and end for both the date and time of this new event. Select Ok at the bottom of this screen to return to the main create event view
- Recurring event - By selecting this area the popup window will slide to the right and you can select a time that this event will reoccur on. Select Ok at the bottom of this screen to return to the main create event view. The options available are for an event to recur:
- No recurrence
- Every day
- Every week
- Every two weeks
- Every month
- Every year.
- End repeat - By selecting this area the popup window will slide to the right and you can select a specific date for the recurring event to stop on. Any date after the selected date will not display the previously recurring event. Select Ok at the bottom of this screen to return to the main create event view.
- Calendar - By selecting this area the popup window will slide to the right and you can select a calendar to create this event in by selecting this from the dropdown menu. Only calendars where you are the owner or have admin access to are shown on this list. Any date after the selected date will not display the previously recurring event. Select Ok at the bottom of this screen to return to the main create event view
- Invitations - If you wish to add other users to view this calendar event you can select manage invitations. This will open up another popup window where you can undertake a search for users or groups to invite to the calendar. If a user is invited to an event, they will be notified via their personal notifications area.
- Once you are happy with the above settings you can select the Create event button at the bottom middle of this popup window to create the event. At any point you can select the cross at the top right of this create event box or select the red cancel button at the bottom of this screen to return to the Calendar view.
Note: You can enter a note into the text area provided. This note will display underneath the calendar name when viewing the calendar in a smaller font than the event name.
Editing an Event
Existing calendar events can be edited provided that you created them or have administrator access over them. To edit an event select it in the calendar. The calendar entry dialog will now be displayed. To edit an item of the entry, select it and amend the details as required. To save any changes you have made, select the Save changes button.
To delete your entry select the Delete button. You will be prompted to confirm this action.
Sharing an Event
You can invite users to a particular event either when you first create the event or after the event has been created by editing it. While the event dialog is open select the Manage invitations option. The Invitations dialog will now be displayed.
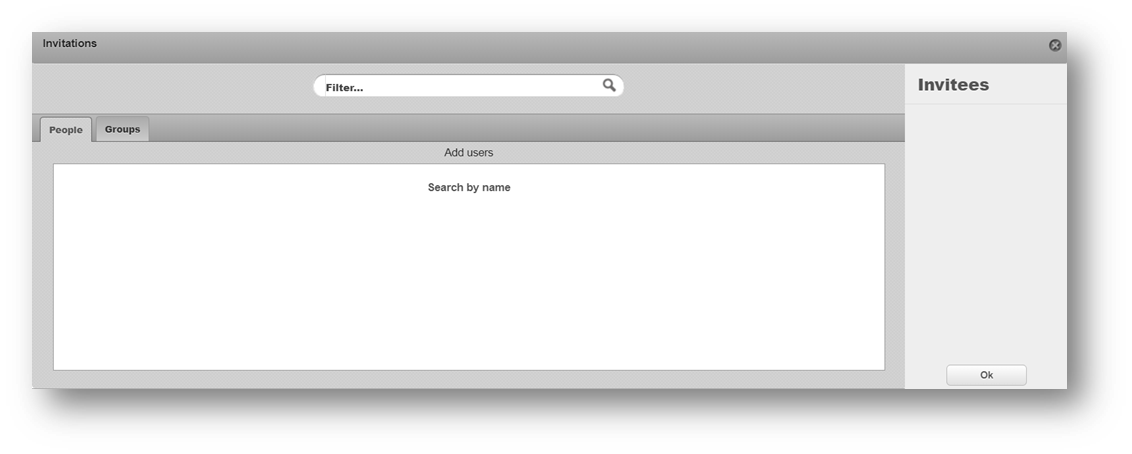
To search for a user or group to invite, select the appropriate tab and then enter a search term in the search bar. A live search is performed as you type and results will begin to appear in the user or group results list. Within the results list, add a user to the list of invitees by selecting the Add button. The users added will appear in the list of invitees and can be removed from this list if added unintentionally by selecting the red X button. Select the OK button to confirm the listed invitees. A summary of the users that are to be invited will now appear in event dialog.
You can see the status of the invite alongside the details of the user within the list;
- Green - User has accepted the invite and is attending
- Blue - User is undecided and may or may not be attending
- Red - User has declined the invite and is not attending.
Any users you invite will receive a notification of the invitation. You will receive notifications when a user replies to the invite.
Sharing a Calendar
The platform allows you to share any calendar you create or have admin control over, excluding your Personal calendar. To share a calendar expand the calendar’s menu in the calendar list and select the Calendar settings option. Within the Calendar settings options is the Share this calendar section. This area allows you to change the sharing settings for the calendar.
The following options can be applied to the calendar:
- Restricted access - This level prevents anyone from seeing the calendar other than yourself and those you share the calendar with specifically
- Share with all logged in users - This level of access allows any logged in user to see the calendar
- Share with specific people - This list contains those users that you have specifically given access to your calendar. To add people to the list select the Invite people to share this calendar option. To search for a user or group to invite, select the appropriate tab and then enter a search term in the search bar.
A live search is performed as you type and results will begin to appear in the user or group results list. Within the results list, add a user to the list of invitees by selecting the Add button. Select the OK button to confirm the listed invitees. Once added the user will appear in the specific user list. Permission level can then be set using the Permission settings drop down menu. To remove a users access to the calendar, select the grey X button to remove them.